Key Management
What is key management


Advantages with key management
Screen shoots
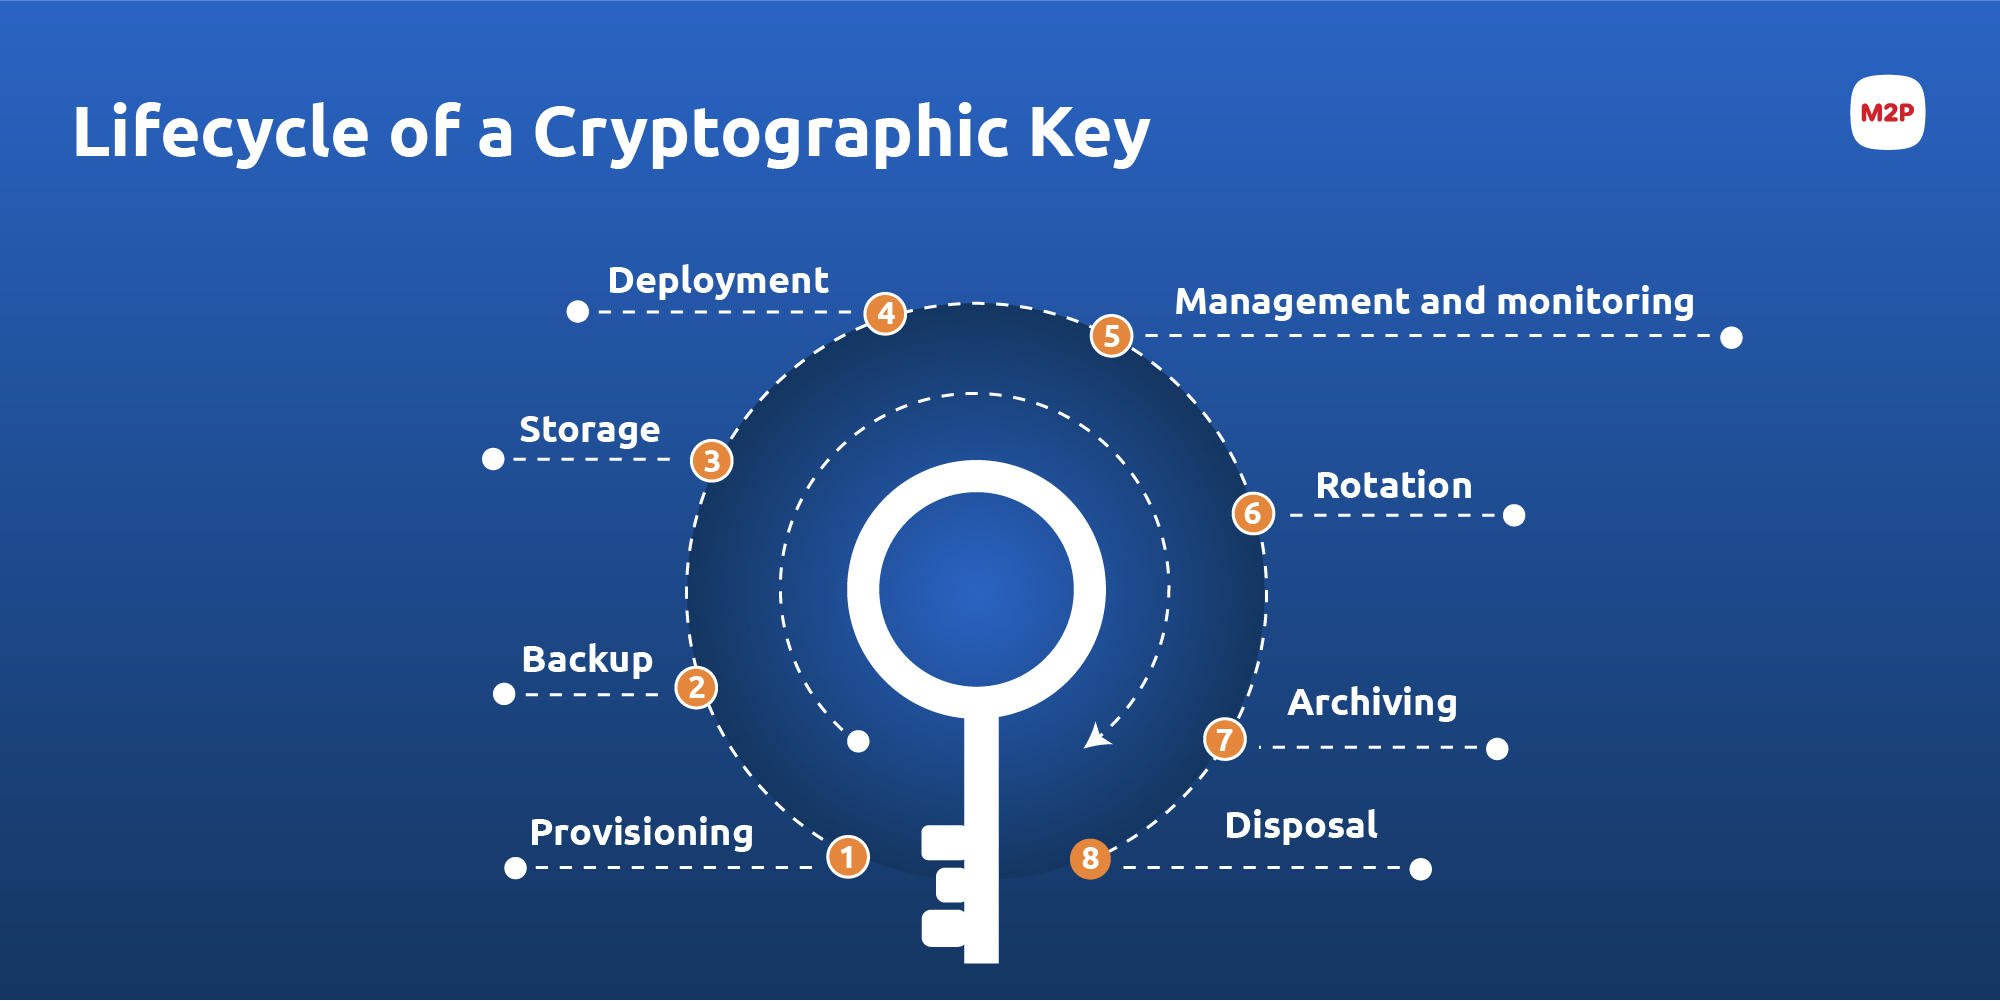
Life cycle key

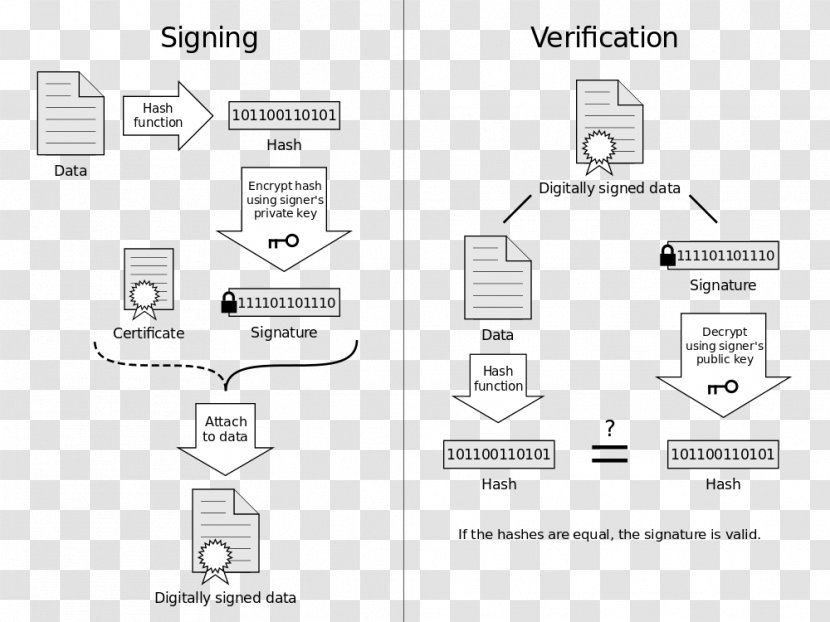
Digital Signature

Termomonlogy and Concept
Cryptography: The science of securing communication and data by encoding it into an unreadable format and then decoding it back into its original form.Encryption: The process of converting plaintext into ciphertext using an encryption algorithm and a cryptographic key.Decryption: The process of converting ciphertext back into plaintext using a decryption algorithm and a cryptographic key.Symmetric Encryption: Encryption where the same key is used for both encryption and decryption.Asymmetric Encryption: Encryption where a pair of keys, a public key and a private key, are used for encryption and decryption respectively.Public Key: A key used for encryption in asymmetric cryptography, which is widely distributed and available to anyone.Private Key: A key used for decryption in asymmetric cryptography, which is kept secret by its owner.Key Pair: A set of two related keys, typically consisting of a public key and a private key in asymmetric cryptography.Key Generation: The process of creating cryptographic keys using algorithms and random number generators.Key Distribution: The process of securely sharing cryptographic keys between communicating parties.Key Exchange: The process of securely transmitting cryptographic keys between communicating parties.Key Agreement: Protocols and algorithms used to establish a shared secret key between parties.Key Derivation: Generating new cryptographic keys from existing keys, typically used for session keys or derived keys.Key Rotation: The practice of periodically changing cryptographic keys to mitigate the risk of compromise.Key Revocation: The process of invalidating a cryptographic key, typically due to compromise or expiration.Key Escrow: A process where a trusted third party holds a copy of cryptographic keys for recovery or legal purposes.Digital Signature: A cryptographic technique used to verify the authenticity and integrity of digital messages or documents.Hash Function: A mathematical function that converts an input (or ‘message’) into a fixed-size string of bytes.Hash Value: The output of a hash function, often represented as a fixed-size string of characters.Message Authentication Code (MAC): A cryptographic checksum used to verify the integrity and authenticity of a message.Secure Hash Algorithm (SHA): A family of cryptographic hash functions designed by the National Security Agency (NSA).Advanced Encryption Standard (AES): A widely used symmetric encryption algorithm adopted as a standard by the U.S. government.Data Encryption Standard (DES): A symmetric encryption algorithm developed by IBM in the 1970s.RSA: An asymmetric encryption algorithm named after its inventors Rivest, Shamir, and Adleman.Elliptic Curve Cryptography (ECC): A type of asymmetric cryptography based on elliptic curves over finite fields.
Symmetric keys vs asymmetric keys
Asymmetric key generation and symmetric key generation are two fundamental cryptographic techniques used to secure data and communication. Here’s a summary of each:
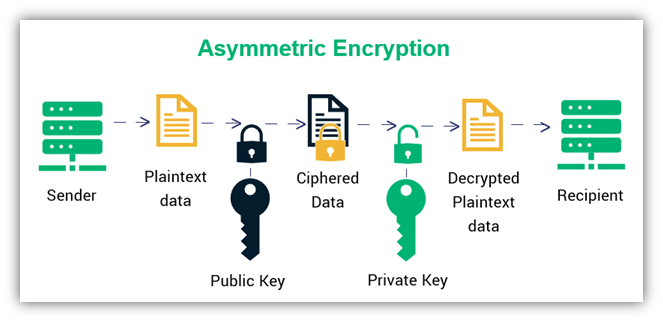
Asymmetric Key Generation: Asymmetric cryptography, also known as public-key cryptography, employs a pair of keys: a public key and a private key. The keys are mathematically related, but they serve different purposes:
Public Key: This key is widely distributed and used for encryption by anyone who wants to send a message securely to the owner of the corresponding private key.Private Key: This key is kept secret by its owner and used for decryption. It’s used to decrypt messages encrypted with the corresponding public key and to digitally sign messages.
Key generation in asymmetric cryptography involves:
Generating Key Pair: The process starts by generating a key pair consisting of a public key and a corresponding private key using algorithms like RSA, DSA, or ECC.Distribution: The public key is distributed widely, often through digital certificates or key repositories, while the private key is kept securely by its owner.
Asymmetric cryptography offers benefits such as secure key exchange, digital signatures, and non-repudiation. However, it’s computationally intensive, making it less suitable for encrypting large amounts of data.
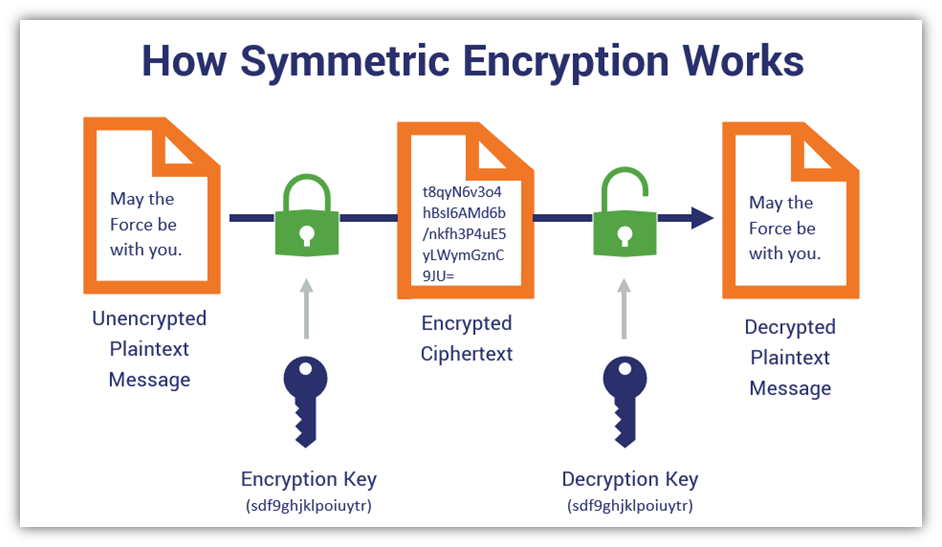
Symmetric Key Generation: Symmetric cryptography, also known as secret-key cryptography, uses a single key for both encryption and decryption. The same key is shared between the communicating parties, hence the term “symmetric.” Key generation in symmetric cryptography involves:
Generating a Key: A symmetric encryption algorithm, such as AES (Advanced Encryption Standard) or DES (Data Encryption Standard), is used to generate a shared secret key.Key Distribution: As both parties need access to the same key, securely distributing the key becomes crucial. This often involves pre-sharing the key through secure channels or using key establishment protocols like Diffie-Hellman.
Symmetric cryptography is much faster than asymmetric cryptography and is well-suited for encrypting large volumes of data. However, key distribution can be challenging, especially in large-scale systems or over insecure channels.
In summary, asymmetric key generation involves creating a pair of mathematically related public and private keys, whereas symmetric key generation involves creating a single shared secret key. Each approach has its advantages and use cases, and they are often used together in hybrid cryptographic systems to leverage their respective strengths.
Important files
Server Side
~/.ssh/authorized_keys
This file contains the public keys of client that can authorized for a user. Important to know is that this file is on per user account. Each line is a public key and starts usually with
ssh-rsa AA……….
Not that this file is stored in folder ~/.ssh/ (and is hidden) of an user or root
The ~/.ssh/authorized_keys file, located in the .ssh directory within a user’s home directory on a server, is a crucial component of SSH key-based authentication. It contains a list of public keys that are authorized to log in to the user’s account on the server without requiring a password.
Here’s an overview of the authorized_keys file:
Location: Theauthorized_keysfile is typically located in the.sshdirectory within the home directory of the user account on the server. The full path is usually~/.ssh/authorized_keys.Format: Each line in theauthorized_keysfile represents a public key. The format of each line is as follows:ssh-rsa AAAAB3NzaC1yc2EAAAADAQABAAABAQC5FyYp... user@hostname- The first field (ssh-rsa) indicates the type of key.
- The second field (AAAAB3NzaC1yc2EAAAADAQABAAABAQC5FyYp…) is the actual public key data.
- The last field (user@hostname) is a comment, typically indicating the user and hostname for which the key is authorized. This field is optional and can be helpful for identification purposes.
Adding Keys: When using SSH key-based authentication, you can add your public key to theauthorized_keysfile manually or by using utilities likessh-copy-id. Each public key should be added on a new line.Permissions: For security reasons, the authorized_keys file and the .ssh directory should have restrictive permissions. The directory should have permissions 700, and the authorized_keys file should have permissions 600.Multiple Keys: You can add multiple public keys to theauthorized_keysfile, allowing multiple users or devices to authenticate to the same user account on the server using SSH keys.
By maintaining the authorized_keys file, server administrators can control which public keys are allowed to access each user account, providing a secure and convenient method of authentication for SSH connections.
Client Side
~/.ssh/known_hosts
The known_hosts file on the client side is a text file that contains a list of hostnames and their associated public keys. It serves as a database of the SSH server host keys that the client has encountered and verified in the past. This file is used by the SSH client to verify the identity of SSH servers it connects to and to prevent man-in-the-middle attacks.
Here’s an overview of the ~/.ssh/known_hosts file:
Location: Theknown_hostsfile is typically located in the.sshdirectory within the user’s home directory on the client machine. The full path is usually~/.ssh/known_hosts.Format: Each line in the known_hosts file represents a unique SSH server and its associated public key. The format of each line is as follows:example.com ssh-rsa AAAAB3NzaC1yc2EAAAADAQABAAABAQC5FyYp...- The first field (example.com) is the hostname or IP address of the SSH server
- The second field (ssh-rsa) indicates the type of public key used by the server.
- The third field (AAAAB3NzaC1yc2EAAAADAQABAAABAQC5FyYp…) is the actual public key data.
- Each line may contain additional data, such as comments or options, separated by whitespace.
Adding Entries: When you connect to a new SSH server for the first time, its public key fingerprint is added to the known_hosts file. You’ll be prompted to verify the authenticity of the host by comparing the fingerprint. If you choose to continue connecting, the server’s public key is added to the known_hosts file.Security: The known_hosts file helps prevent man-in-the-middle attacks by alerting users if the public key of a server they are connecting to has changed since the last connection attempt. If the SSH client detects a mismatch between the stored public key and the one presented by the server, it will issue a warning to the user.Maintenance: Over time, entries may accumulate in the known_hosts file as you connect to different SSH servers. It’s important to periodically review and update this file to remove outdated entries or entries associated with servers you no longer connect to.
By maintaining the known_hosts file, SSH clients can verify the identity of SSH servers they connect to, helping to ensure secure and authenticated communication.
SSL Certificate
Here’s a step-by-step process for obtaining an SSL certificate:
Determine Certificate Type: Decide whether you need a single domain certificate, a wildcard certificate (valid for all subdomains of a domain), or a multi-domain certificate (valid for multiple domains).Choose a Certificate Authority (CA): Research and choose a reputable CA that offers SSL certificate services. Some popular CAs include Let’s Encrypt, DigiCert, Sectigo (formerly Comodo), and GoDaddy.Generate a Certificate Signing Request (CSR):- Use OpenSSL or your web server’s control panel to generate a CSR.
- Provide information such as the domain name, organization name, and location.
Submit CSR to the CA:- Log in to your CA’s website or portal.
- Submit the CSR along with any required verification information.
Verification Process:- The CA verifies ownership of the domain and organization (if applicable).
- Verification methods may include email verification, DNS record validation, or file-based verification.
Choose Certificate Validity Period:- Select the desired validity period for the certificate (e.g., 1 year, 2 years).
Complete Payment:- Pay for the SSL certificate, either as a one-time fee or a recurring subscription.
Receive and Install Certificate:- Once the verification process is complete and payment is confirmed, the CA issues the SSL certificate.
- Download the certificate files from the CA’s website or receive them via email.
- Install the certificate on your web server by following the CA’s instructions or using your web hosting control panel.
Configure Web Server:- Configure your web server to use the SSL certificate for HTTPS connections.
- Update your website’s configuration to redirect HTTP traffic to HTTPS for secure communication.
Test SSL Installation:- Use online SSL checker tools to verify that the SSL certificate is installed correctly and functioning properly.
- Test HTTPS connections to ensure that visitors can access your website securely.
Renewal and Maintenance:- Monitor the expiration date of your SSL certificate and renew it before it expires to ensure uninterrupted service.
- Keep your SSL certificate and web server software up to date with security patches and updates.
By following these steps, you can obtain and install an SSL certificate to secure your website and provide encrypted communication for your visitors.
Commands - Key generation
| DESCRIPTION | COMMAND |
|---|---|
|
Generates an SSH key pair with a specific key length of 4096 bits 1024, 2048, 4096 most common key size for RSA (OpenSSH Format) |
ssh-keygen -b 4096 |
|
Generates an SSH private key with a specific key length of 4096 bits 1024, 2048, 4096 most common key size for RSA (PEM Format) |
openssl genpkey -algorithm RSA -out private_key.pem -pkeyopt rsa_keygen_bits:4096 |
|
Generates an SSH public key(from the private key in previous step) with a specific key length of 4096 bits 1024, 2048, 4096 most common key size for RSA(PEM Format) |
openssl rsa -pubout -in private_key.pem -out public_key.pem |
|
Generates an ECC key pair using the ECDSA with key length 256 256, 384, 521 are most common key length Some ssh-gen implementation do NOT support ECC keys |
ssh-keygen -t ecdsa -b 256 -f my_ecc_key |
| Generate ECC private key | openssl ecparam -name prime256v1 -genkey -noout -out my_ecc_private_key.pem |
| Generate ECC public key | openssl ec -in my_ecc_private_key.pem -pubout -out my_ecc_public_key.pem |
|
Generate the public key (assymetric) from the private key as base id_rsa is the private key and id_rsa.pub is the public key |
ssh-keygen -y -f id_rsa > id_rsa.pub |
| Generates a new SSH key pair using the Ed25519 cryptographic algorithm(256 bit key size) | ssh-keygen -t ed25519 |
Commands - Exchange keys
| DESCRIPTION | COMMAND | NOTE |
|---|---|---|
|
Copy the public key(on the client) to the server You will need to have credential for username It copies the public key into the file ~/.ssh/authorized_keys on the server |
ssh-copy-id username@remote_host |
Authetication with keys for user username |
|
Copy the public key(on the client) to the server You will need to have credential for root It copies the public key into the file ~/.ssh/authorized_keys on the server |
ssh-copy-id root@ip.adress.on.server |
Authetication with keys for user root |
|
The command copies the specified public key file (thepublickey.pub) to the authorized_keys file for the root user on the remote server at IP address 132.12.56.67 using port 2222 for SSH connections. |
ssh-copy-id -i ~/.ssh/thepublickey.pub -p 2222 root@132.12.56.67 |
Authetication with keys for user root |
Commands - Misc
| DESCRIPTION | COMMAND | NOTE |
|---|---|---|
| Retrieve the SSH public keys of a remote server | ssh-keyscan "hostname_or_IP" | |
|
Retrieve the SSH public keys of a remote server and save it to file keys.pub |
ssh-keyscan freenas.local > keys.pub | |
| Get fingerprint for a public key | ssh-keygen -E MD5 -lf "path_to_public_key.pub" | |
|
Get fingerprint for a public key older version |
ssh-keygen -lf keys.pub |
Caution
When you encounter mismatches in public key fingerprints, particularly with services like GitHub, it’s often due to the way the fingerprints are displayed and stored.
Here are some common reasons for mismatches:
MD5 Hashing: In the past, GitHub used to display SSH key fingerprints using MD5 hashing, which resulted in a shorter representation of the fingerprint. However, due to security concerns related to MD5, GitHub has since moved away from displaying fingerprints in this way.SHA-256 Hashing: GitHub now uses SHA-256 hashing to display SSH key fingerprints. This results in a longer and more secure representation of the fingerprint.Different Key Formats: Sometimes, the public key fingerprints may appear differently due to variations in the format of the keys. For example, different implementations may use different line breaks, spacing, or encoding methods, which can affect the fingerprint calculation.Key Rotation: SSH keys can be rotated or replaced over time for security reasons. If the SSH key associated with your GitHub account changes, the fingerprint displayed on GitHub will also change accordingly.
To ensure that the SSH key fingerprint displayed by GitHub matches the fingerprint of your local SSH key, you should verify the fingerprint using the appropriate hashing algorithm. For example, you can use the ssh-keygen command to generate the SHA-256 fingerprint of your SSH key:
ssh-keygen -lf ~/.ssh/id_rsa.pub
This command will display the SHA-256 fingerprint of your SSH public key. You can then compare this fingerprint with the one displayed on GitHub to ensure that they match.
By comparing the fingerprints using the same hashing algorithm, you can verify the authenticity of your SSH key and ensure that it matches the one stored by the service (e.g., GitHub).

