Apache
What is Apache


How to install Apache
This is actually a multiple step procedure. This will cover Debian and Ubuntu install
Before Installing there are some good prerequisite
1. Set up an server on a Virtual Private Server (VPS)
2. Have a registrated domain name and it’s actually a good ide to set the A record to point to that server created in the previous step.
3. SSH into that server
4. Make sure that the packages are the latest version
sudo apt update && apt upgrade -y
and reboot the server
sudo systemctl reboot
5. Change the hostname from localhost to something else e.i the same as the domain name you registrated in step 2 (preferrable – not required but something descriptive)
sudo nano /etc/hostname
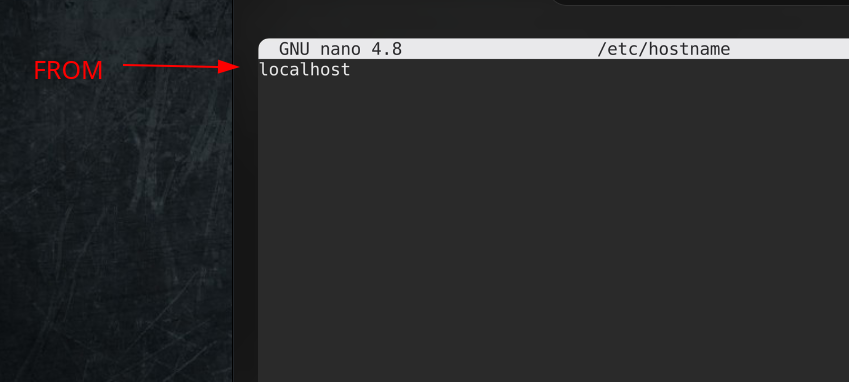
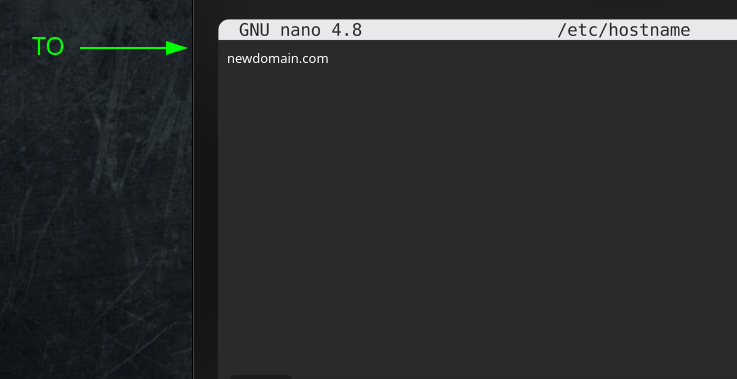
6. Change host to reflect this by adding a new line
sudo nano /etc/hosts
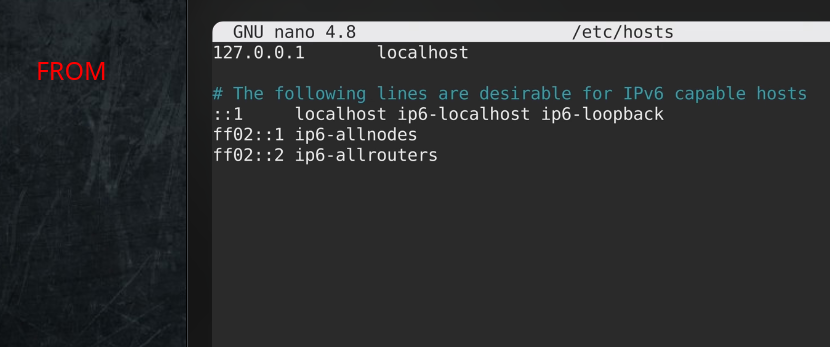
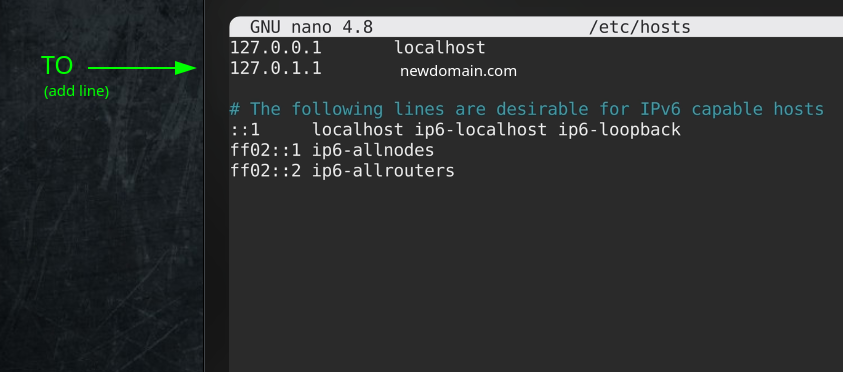
7. reboot the server
sudo systemctl reboot
8. Verify that hostname has changed (Do NOT rely on prompt)
hostname
OR
hostname -I
Optional step (this is not required but considered good practise) – Disable root account
a) Create a user and add it to the group sudo (automation)
sudo adduser guddaniel sudo
(user guddaniel password 12345, PS remember password and username)
b) Disable root login via ssh by modifying or change PermitRootLogin value in file /etc/ssh/sshd_config
sudo nano /etc/ssh/sshd_config
PermitRootLogin no
b) Restart the service
sudo systemctl restart ssh
9. Install Apache
sudo apt install apache2 apache2-doc apache2-utils
10. Verify that Apache is running
systemctl status apache2
(After installation go to ip address where Apache Server is installed and the welcome page for apache should be displayed
Optional
11. Install firewall if not present
sudo apt install ufw
12. Configure the firewall. Show all apps
sudo ufw app list
(Will return something like)
Apache
Apache Full
Apache Secure
OpenSSH
13. Set rules in firewall
sudo ufw allow 'Apache Full'
sudo ufw allow OpenSSH
14. Start the firewall
sudo systemctl start ufw
15. Create some folder if not present
cd /var/www/html
sudo mkdir newdomain.com
cd newdomain.com
sudo mkdir public_html
sudo mkdir logs
sudo mkdir backups
16. Create a simple index.html inside /var/www/html/public_html/newdomain.com
<!DOCTYPE html>
<html lang="en">
  <head>
    <meta charset="UTF-8">
    <meta name="viewport" content="width=device-width, initial-scale=1.0">
    <meta http-equiv="X-UA-Compatible" content="ie=edge">
    <title>HTML 5 Template Code</title>
  </head>
  <body>
	<h1>Hello World Custom Apache Web Page</h1>
  </body>
</html>
and talknerd.php
inside /var/www/html/public_html/newdomain.com
<?php
phpinfo();

?>
Note: Its not a bad idea to create a index.html, foo.html and talkbase.php in the default root directory that the installation provides. It is useful for testing purposes. Be sure to make content inside then distingushable from thoose in /var/www/html/public_html/newdomain.com/ files
17. Secure with SSL
Install all packages needed for certbot
sudo apt install certbot python3-certbot-apache
Get the cert
sudo certbot --apache -d newdomain.com
Also for subdomain
sudo certbot --apache -d newdomain.com -d www.newdomain.com
Note 1: Enable apache modules – You may need to enable some modules in order for ssl to work properly, sudo a2enmod ssl rewrite headers wsgi socache_shmcb && sudo systemctl restart apache2
Note 2: Simulate a renewal certificate – sudo certbot renew --dry-run
Note 3: Renew Manually – sudo certbot renew
Termomonlogy and Concept
HTTP: Hypertext Transfer Protocol, the underlying protocol used by Apache for communication between web clients and servers.Virtual Host: Configuration that allows Apache to serve multiple websites from the same physical server.DocumentRoot: The directory on the server where Apache looks for web files to serve.Module: A component that extends Apache’s functionality, such as mod_ssl for SSL encryption or mod_rewrite for URL rewriting..htaccess: A configuration file that allows per-directory configuration overrides, commonly used for access control and URL rewriting.SSL/TLS: Secure Sockets Layer/Transport Layer Security, protocols used to encrypt data transmitted between the web server and clients.Apache Logs: Files where Apache records information about server activity, including access logs and error logs.Configuration Directives: Settings in Apache’s configuration files (httpd.conf or apache2.conf) that control server behavior.Server Status: A feature that provides real-time information about Apache’s performance, including active connections and server uptime.Load Balancing: A technique used to distribute incoming web traffic across multiple servers to improve performance and reliability.Reverse Proxy: Configuration that allows Apache to act as an intermediary between clients and backend servers, often used for caching or load balancing.Modular Architecture: Apache’s design that allows administrators to enable or disable specific features as needed, improving performance and security.Worker vs. Prefork MPM: Multi-Processing Modules that determine how Apache handles incoming requests and manages server processes.CGI: Common Gateway Interface, a standard protocol for interfacing external applications with web servers, allowing dynamic content generation.Rewrite Rules: Directives used in Apache’s mod_rewrite module to manipulate URLs, enabling features like redirection and URL mapping.Authentication: Mechanism used to control access to web resources, including Basic Authentication, Digest Authentication, and LDAP-based authentication.Access Control: Policies and rules used to restrict or grant access to specific directories, files, or URLs on the web server.KeepAlive: A feature that allows multiple HTTP requests to be sent over a single TCP connection, reducing latency and improving performance.
Folder/files structure and configuration

- /etc/apache2/ or /etc/httpd/: This directory contains the main configuration files for Apache. Important files within this directory include:
- apache2.conf or httpd.conf: The main configuration file for Apache, containing global settings such as server ports, user privileges, and module loading.
- sites-available/: Directory containing configuration files for individual websites or virtual hosts.
- sites-enabled/: Symbolic links to configuration files in sites-available that are currently active.
- mods-available/: Directory containing configuration files for Apache modules.
- mods-enabled/: Symbolic links to configuration files in mods-available for currently active modules.
- conf-available/: Directory containing additional configuration snippets.
- conf-enabled/: Symbolic links to configuration snippets in conf-available that are currently enabled.
- /var/www/ or /var/www/html/: This is the default document root directory where web files are stored. The important files and folders within this directory include:
- index.html or index.php: Default homepage for the web server.
- css/, js/, images/: Directories for storing CSS files, JavaScript files, and images used by the website.
- .htaccess: Configuration file for directory-level settings such as access control and URL rewriting.
- cgi-bin/: Directory for storing CGI scripts if CGI is enabled.
- /var/log/apache2/ or /var/log/httpd/: This directory contains Apache log files. Important files within this directory include:
- access.log: Log file containing records of all requests made to the server.
- error.log: Log file containing records of errors encountered by the server.
- /usr/lib/apache2/modules/ or /usr/lib64/httpd/modules/: Directory containing Apache module files.
- /usr/sbin/ or /usr/sbin/httpd: Location of the Apache executable binary.
- /usr/share/doc/apache2/ or /usr/share/doc/httpd/: Directory containing Apache documentation and example configuration files.
- /var/run/apache2/apache2.pid : Directory where the PID files are located
- /usr/lib/systemd/system/apache2.service and /etc/init.d/apache2 : Start up scripts
Extend Apache functionality
You can extend Apache’s functionality by installing modules. Apache’s modular architecture allows you to add or remove features as needed, enabling you to customize the server to meet your specific requirements.
Here’s how you can extend Apache’s functionality:
Installing Modules: Apache provides a wide range of modules that you can install to add specific features or capabilities to your web server. These modules can include functionality for SSL/TLS encryption, URL rewriting, authentication mechanisms, content caching, and more. You can typically install modules using your operating system’s package manager or by compiling Apache from source with the desired modules enabled.Enabling/Disabling Modules: Once installed, you’ll need to enable the desired modules in Apache’s configuration files. Depending on your Apache installation, you may have separate configuration files for each module (e.g., mods-available/ directory in Debian-based systems) or a single configuration file where you can enable/disable modules using directives likeLoadModuleorInclude.Customizing Module Configuration: After enabling a module, you can often customize its behavior by modifying its configuration settings in the appropriate configuration files. These settings can control various aspects of the module’s functionality, such as specifying encryption algorithms for SSL/TLS, defining rewrite rules for URL rewriting, or configuring access control for authentication modules.Third-Party Modules: In addition to the modules distributed with Apache, there are also third-party modules developed by the community or other organizations that you can install to further extend Apache’s functionality. These modules can add support for specific technologies, protocols, or integrations that may not be included in the default Apache distribution.
By leveraging Apache’s modular architecture and installing the appropriate modules, you can tailor your web server to suit the requirements of your website or application, enhancing its performance, security, and functionality as needed.
A great way of actually search for modules is to use the apt search functionality
apt search libapache2-mod
(The packages usually start with libapache2-mod, so installing the php modulue you need to
apt install libapache2-mod-php
The name convention for modules in Debian is
libapache2-mod-<modulenamepackage>
e.i libapache2-mod-php, libapache2-mod-python
Useful commands
apachectl offers more fine-grained control over Apache-specific functionalities
Show all currently enabled modules
sudo apachectl -M
Check syntax of configuration file
apache2 -t
Check Configuration: Check Apache configuration file syntax for errors.
sudo apachectl configtest
To list all configured websites (virtual hosts)
sudo apachectl -S
Status sites that are enabled/disabled
sudo a2query -s
Check whether a site is enabled or not
sudo a2query -s "site_name"
List all enabled modules
sudo a2query -m
Check whether a module is enabled or not
sudo a2query -m "module_name"
Start Apache
sudo apachectl start
Stop Apache
sudo apachectl stop
Restart Apache
sudo apachectl restart
Graceful Restart: Restart Apache gracefully (without dropping active connections).
sudo apachectl graceful
Show Extended Status: Display extended server status (requires mod_status module).
sudo apachectl status
Display on which port apache server is listen
netstat -tuplan | grep apache
Specify to se if apache is listen to port 80 or 443
netstat -tuplan | grep -i '80\|443'
Enable or disable modules
When you enable modules in Apache, they typically show up in the /etc/apache2/mods-enabled. Apache modules are pieces of code that can be dynamically loaded into the Apache HTTP Server at runtime.
a2enmod is the command for enabling module(s)
a2dismod is the command for disable module(s)
All available/installed modules are displayed in folder /etc/apache2/mods-available
The currently enabled modules is displayed in folder /etc/apache2/mods-enabled
Some modules are installed by default and some need to be installed to get the desired functionality.
For example
sudo a2enmod rewrite
Enable the rewrite module
This command creates a symbolic link in the /etc/apache2/mods-enabled directory to the corresponding configuration file in the /etc/apache2/mods-available directory. This symbolic link effectively enables the module.
For example, enabling the rewrite module creates a symbolic link named rewrite.load in /etc/apache2/mods-enabled, pointing to the rewrite.load file in /etc/apache2/mods-available
Commands
(Some command may require that the apache2 service
need to be restarted or reloaded)
| DESCRIPTION | COMMAND |
|---|---|
|
Give options for with modul(es) you want to enable (Also show all modules installed) |
a2enmod |
|
Enables the module ssl |
a2enmod ssl |
|
Disable module(s) (gives a list of enabled modules) |
a2dismod |
| Disable module ssl | a2dismod ssl |
Enable or disable configurations(global)
a2enconf is the command for enabling a configuration
a2disconf is the command for disable a configuration
All available configuration are displayed in folder /etc/apache2/conf-available
The currently enabled sites is displayed in folder /etc/apache2/conf-enabled
Example of a global configuration that enables php-fpm with update-alternatives
Create the file
sudo nano /etc/apache2/conf-available/php-fpm.conf
<IfModule mod_proxy_fcgi.c>
    <FilesMatch \.php$>
        SetHandler "proxy:unix:/run/php/php-fpm.sock|fcgi://localhost"
    </FilesMatch>
</IfModule>
It’s also possible to use environment variables insteed of hardcoding values e.i
Enable or disable websites
a2ensite is the command for enabling a website
a2dissite is the command for disable a website
All available sites are displayed in folder /etc/apache2/sites-available
The currently enabled sites is displayed in folder /etc/apache2/sites-enabled
The configuration for the sites are located in folder (contain *.conf files)
/etc/apache2/sites-available
Example code of a website conf file for
<VirtualHost *:80>
    ServerAdmin webmaster@newdomain.com
    ServerName newdomain.com
    ServerAlias www.newdomain.com

    DocumentRoot /var/www/html

    <Directory /var/www/html/>
        Options FollowSymLinks
        AllowOverride All
        Require all granted
    </Directory>

    # This will setting will be applied to on specific host
    # PHP-FPM configuration, add this section for letting update-alternativs pick php-fpm version
    #<FilesMatch \.php$>
    # Make sure only ONE is active
    # PHP Version 5.6
    # SetHandler "proxy:unix:/run/php/php5.6-fpm.sock|fcgi://localhost"

    # The php handler provided by the package manager in current OS distro
    #   SetHandler "proxy:unix:/run/php/php-fpm.sock|fcgi://localhost"
    #</FilesMatch>


    ErrorLog /var/www/html/newdomain.com/logs/error.log
    CustomLog /var/www/html/newdomain.com/logs/access.log combined
</VirtualHost>
It’s also possible to use environment variables insteed of hardcoding values e.i
ErrorLog ${APACHE_LOG_DIR}/example.net_error.log
CustomLog ${APACHE_LOG_DIR}/example.net_access.log combined
Commands
Enable or Disable sites are made by config files is
/etc/apache2/sites-available
| DESCRIPTION | COMMAND |
|---|---|
|
disable the site 000-default The file 000-default.conf
needs to be present in/etc/apache2/sites-available
|
a2dissite 000-default |
Install Apache php module
To execute PHP code on an Apache server, you typically need to follow these steps:
Install PHPInstall Apache PHP moduleLoad that moduleRestart the apache serverRun a some test code to verify php executes
1. Install PHP
sudo apt install php
verify php is installed by
php -v
2.Install Apache PHP module
sudo apt install libapache2-mod-php
verify Apache PHP module is installed by
cd /etc/apache2/mods-available
ls and se if you find a php8.2.conf and php8.2.load file (may differ depending on php version)
3.Load the apache php module
Check first if the module is loaded
ls /etc/apache2/mods-enabled/
If php8.2.conf is missing then you need to load the module
a2enmod php8.2
ELSE
php8.2.conf is present then the module is already loaded do nothing
4. Restart apache2
systemctl restart apache2
5. Create a info.php file and navigate to page
Note:If a php file is present, this step is not necessary
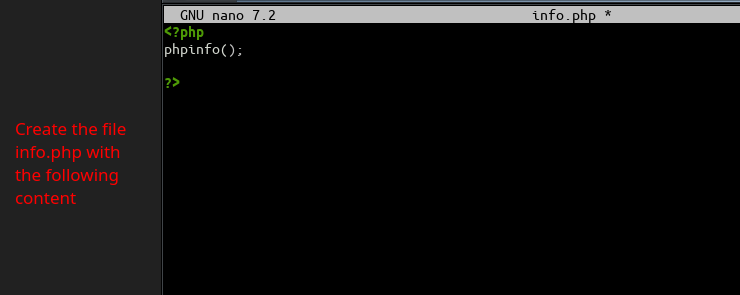
and navigate to page
with no certificate
http://your_server_ip/info.php
OR
http://your_server_domain_name/info.php
and with certificate
https://your_server_ip/info.php
OR
https://your_server_domain_name/info.php
and the output should look something like
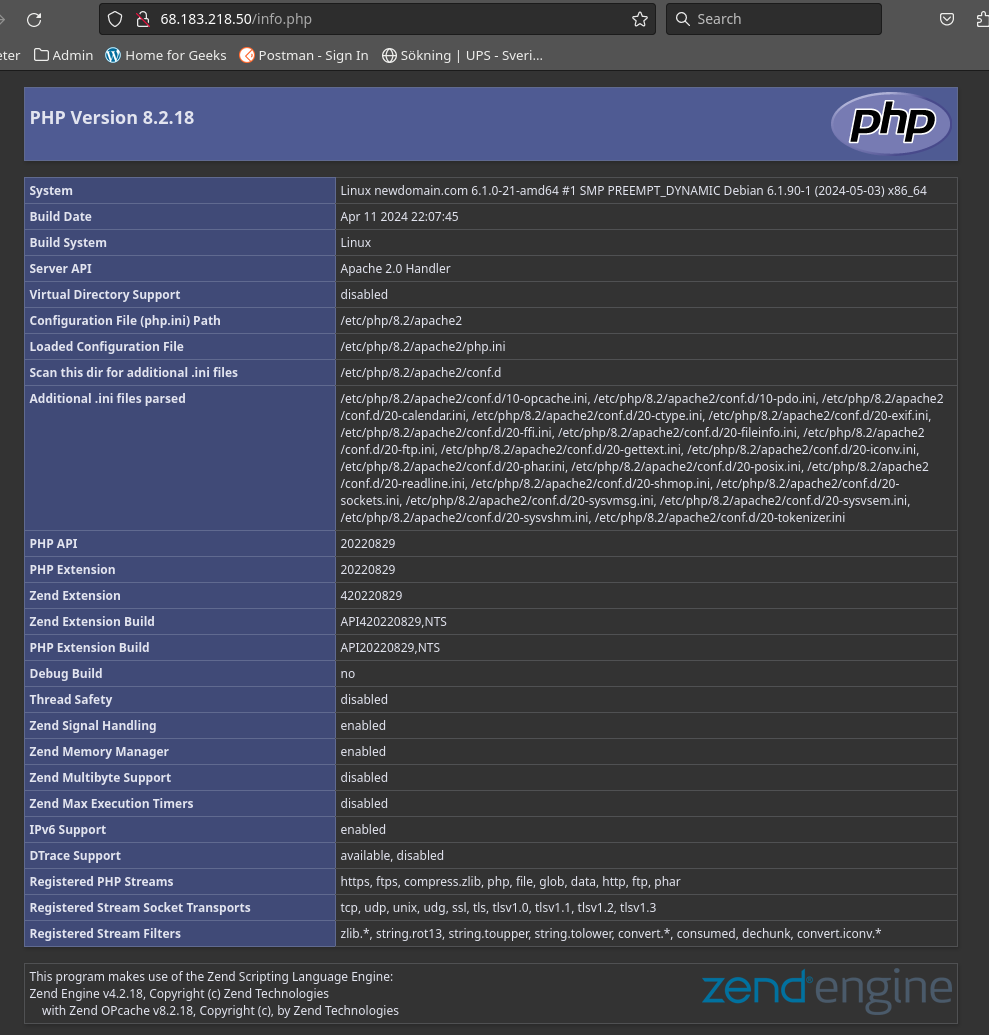
Congrats. You can execute php code on your apache server
Installing fpm-php
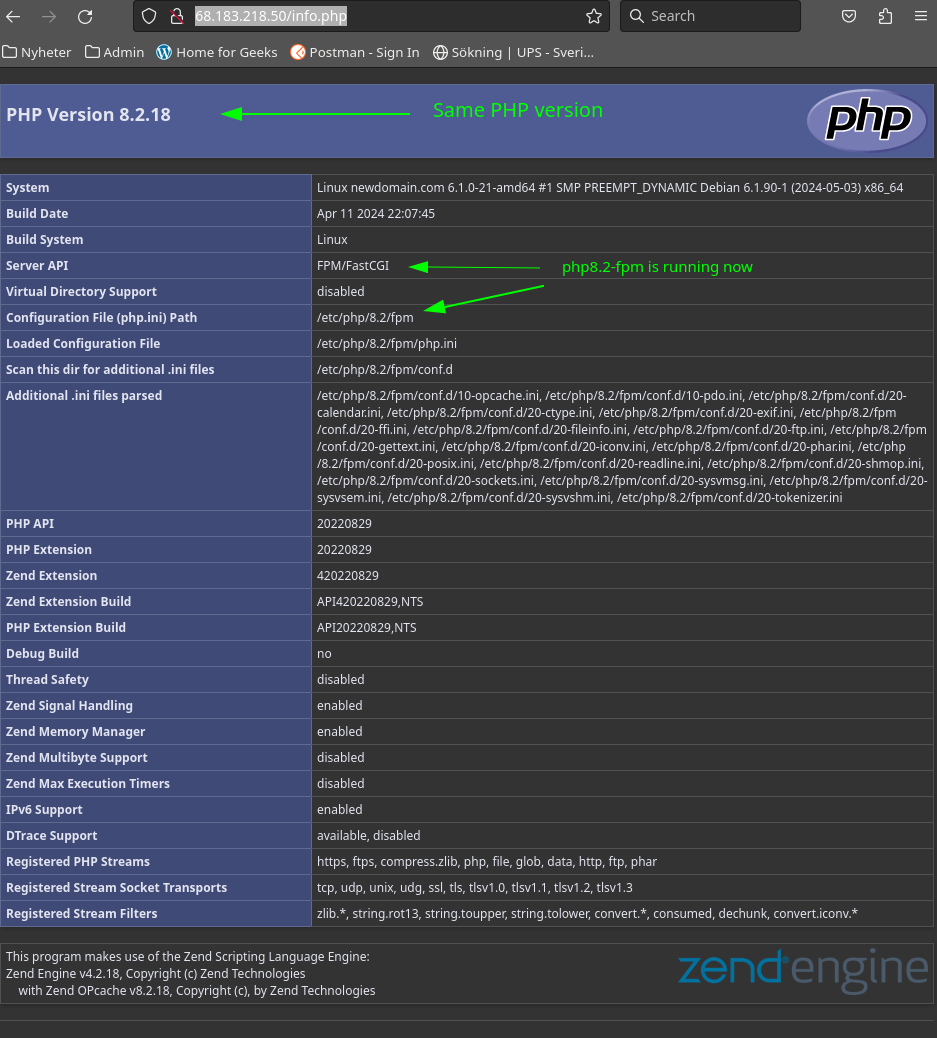
php_info() gives the foolowing page when the apache php module is active
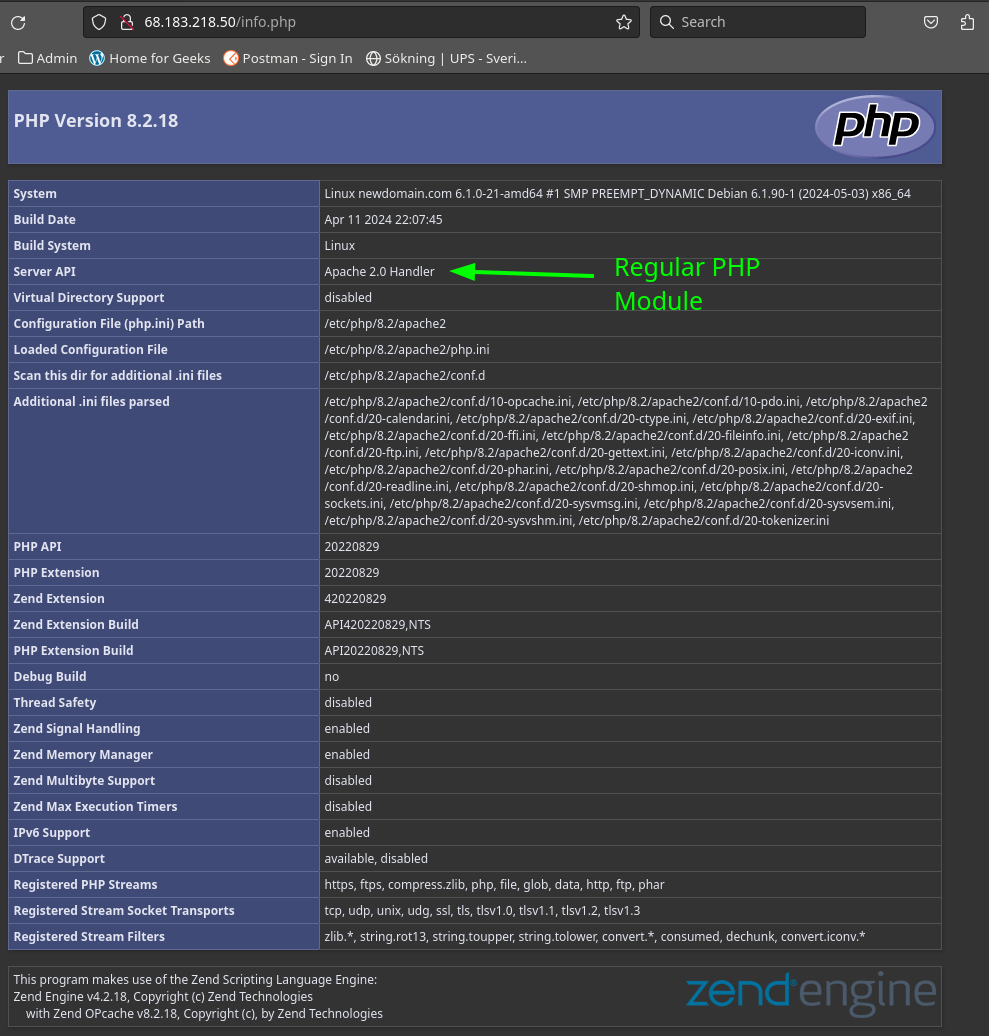
Install the php-fpm package
sudo apt install php-fpm
Verify that the service is running
systemctl status php8.2-fpm
Lets take a peek into the service configuration
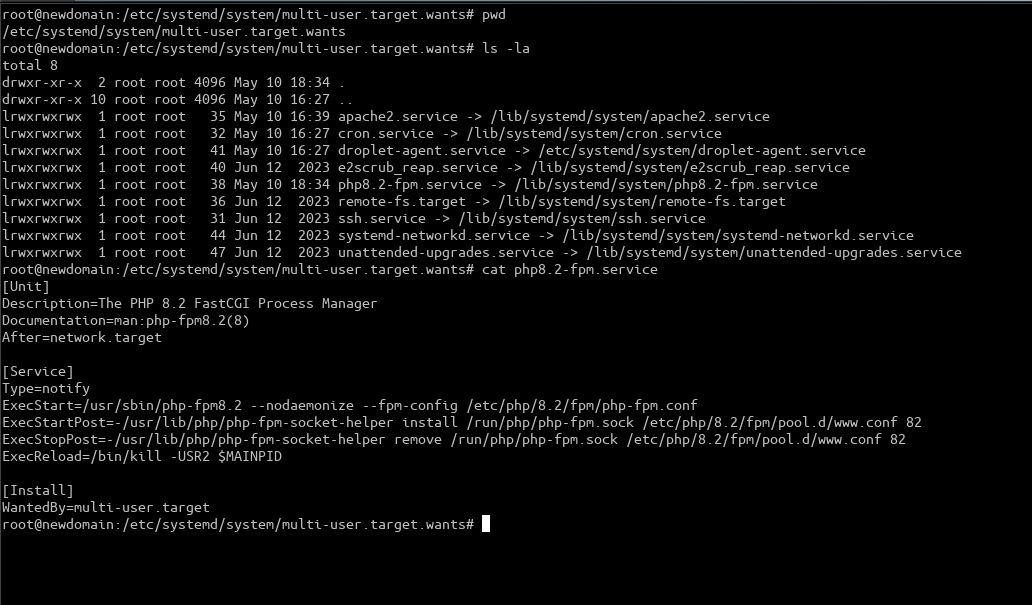
Also have a peek into the configuration for the php-fpm
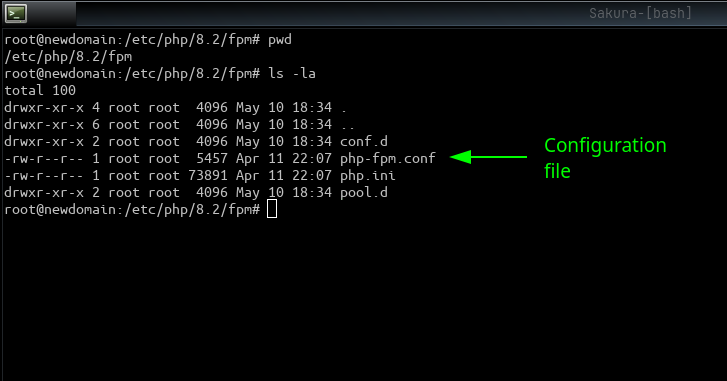
Also have a peek into the pool
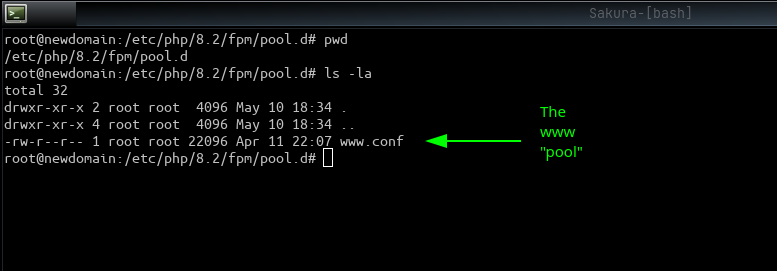
Start be disabling the apache php module
sudo a2dismod php8.2
Restart the apache sever
sudo systemctl restart apache2
Verify that apache php module is not loaded by loading an php file in the browser (perhaps http://68.183.218.50/info.php )
Now lets set apache up for the configuration of fpm-php
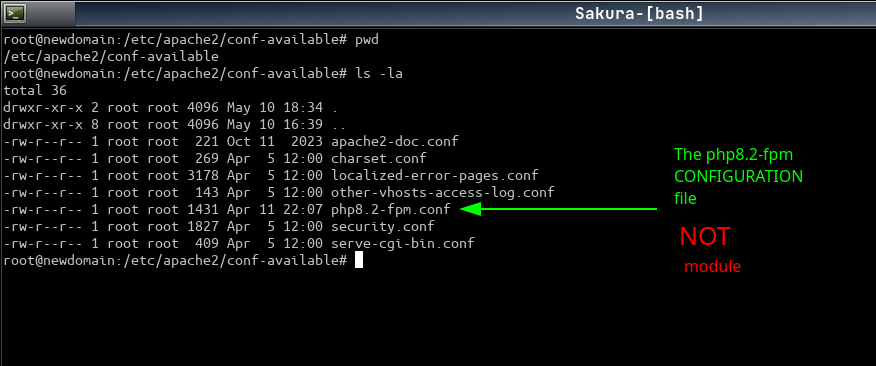
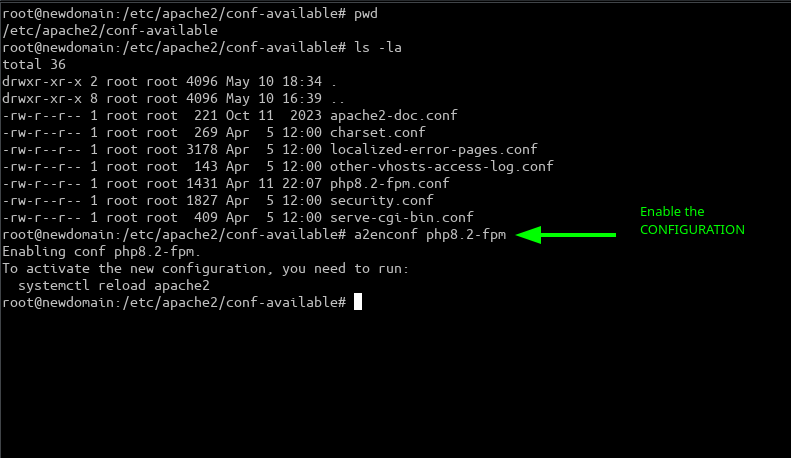
And enable that configuration with
a2enconf php8.2-fpm
We also need a proxy module for php-fpm to be functioning
Install the package libapache2-mod-fcgid – IMPORTANT
sudo apt install libapache2-mod-fcgid
And we need to enable the modules proxy_fcgi setenvif
a2enmod proxy_fcgi setenvif
And now we can restart apache2
systemctl restart apache2
Host multiple sites on single server
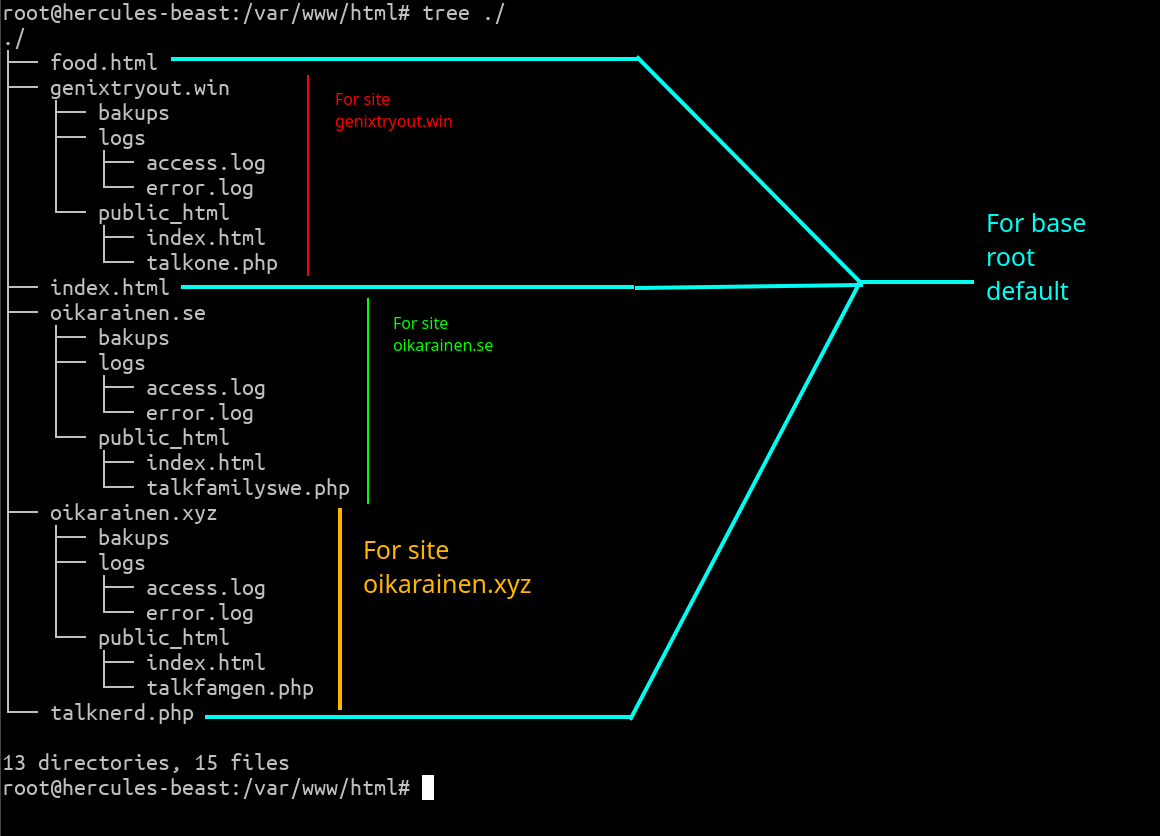
The basic structure is the same for multiple sites on a server. I’ve created some files so that are easily distinguished from each other
And a different configuration for each site

This assumed that you have set up php-fpm. When using it like this you can control the each site which version of php is in us. Note that if the sites are using the same php version they still share the same setting that each php-fpm version have. This could be changed by use the pool feature in php-fpm.
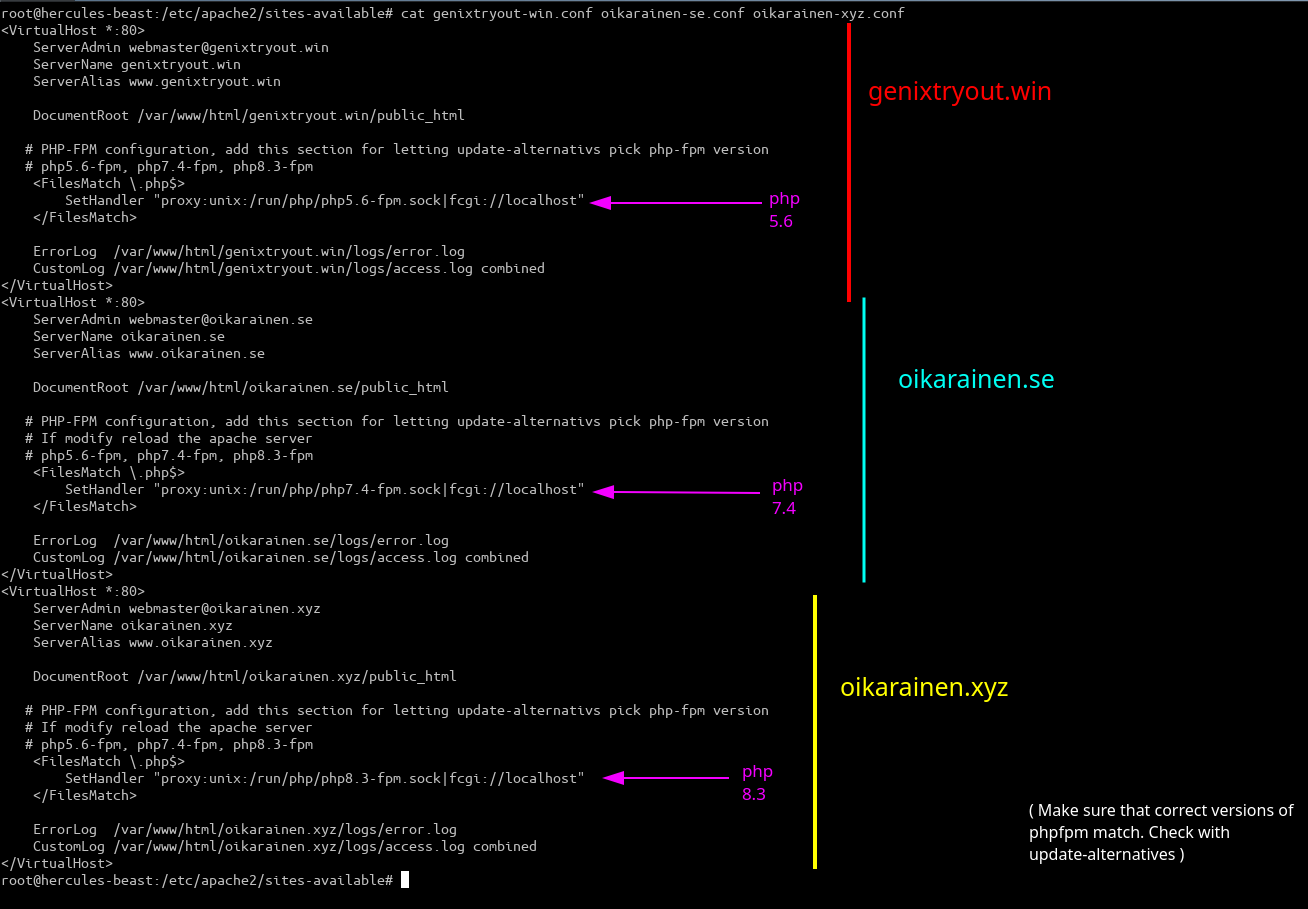
Note: The SetHandler directive only work with the stock/default installation of phpx.y-fpm install. They need to be ‘connected’ to a unix socket file(that gets created by pool config file in directive listen. Se page PHP-FPM for more details
FAQ
A domain is a broader term that refers to a group of network devices that share a common part of their IP address, often called the domain name. This name is organized hierarchically and corresponds to a specific realm of administrative authority on the Internet. It typically consists of a series of labels separated by dots, such as “example.com”. Domains can represent various entities, such as websites, networks, or organizations.
On the other hand, a hostname is the unique label assigned to a specific device within a domain. It’s essentially the name that identifies a particular device, such as a computer or a server, on a network. Hostnames are usually assigned by network administrators and are used for addressing and accessing devices within the domain.
In summary, a domain is a broader organizational unit on the Internet, while a hostname is a specific identifier for a device within that domain.
Domain
- Registered with domain registrars, e.i CloudFare
- Represents a broader organizational unit on the Internet
- Shares a common part of their IP addresses among network devices.
- Typically consists of a series of labels separated by dots, like “example.com”.
- Can represent various entities such as websites, networks, or organizations.
HostName
- Assigned by network administrators.
- Represents a specific device within a domain.
- Is a unique label assigned to a device, like a computer or a server, on a network.
- Used for addressing and accessing devices within the domain.

