Networking
How does network work in Linux
You could divide networking into 3 broad categories
1. Interfaces and configuring them
2. Network Managers
3. Extra tools
Manually config networking (without a network manager)
This will cover Debian and Ubuntu
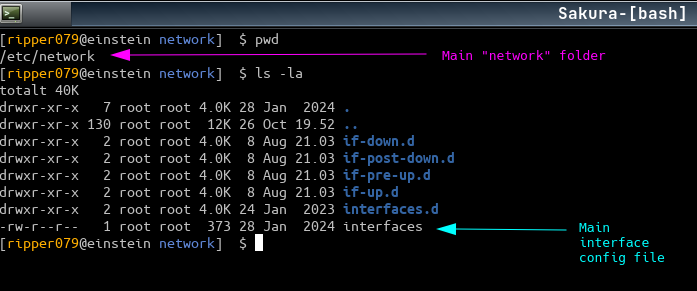
The main folder for network configuration is at
/etc/network/
The main file for configuring interfaces is
/etc/network/interfaces
A typical/normal content for a interface in file
/etc/network/interfaces
might be.
Example Two interfaces (ethernet) displayed here
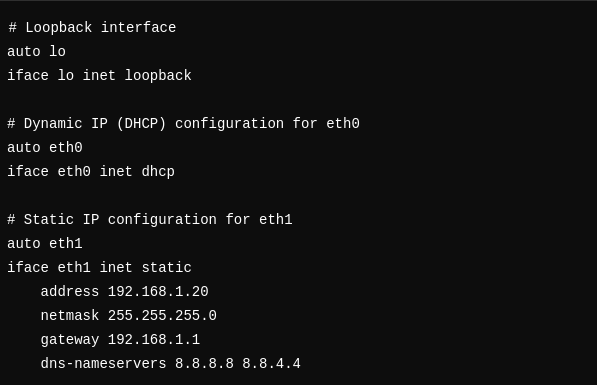
eth0 is configured to use DHCP, allowing it to automatically receive an IP address from the network
eth1 is configured with a static IP (manual setting), assigning it the IP 192.168.1.20 and specifying the gateway and DNS servers.
After making changes to
/etc/network/interfaces
you will need to bring up the interface eth1
sudo ifdown eth1 && sudo ifup eth1
Note:Probably enough with sudo ifup eth1
WireLess setup
If you are connecting to secure wireless connections (which you should) you will need to install wpasupplicant package
sudo apt install wpasupplicant
Example
One wireless interface named wlp5s0
Same file /etc/network/interfaces

you will need to bring up the interface eth1
sudo ifdown wlp5s0 && sudo ifup wlp5s0
Addtion settings in that could be of importance in
/etc/network/interfaces
file
This one if for each block/device
- metric 200
- The metric determines which network interface is preferred when multiple default routes exist.
BONDING
iface bond0 inet dhcp

bond-mode 802.3ad

bond-miimon 100

bond-downdelay 200

bond-updelay 200

slaves enp3s0f0 enp3s0f1
bond-mode 802.3adspecifies the bonding mode (in this case, LACP).slavesspecifies which interfaces are part of the bond.
bridge_ports (for Network Bridging)
iface br0 inet dhcp

bridge_ports enp3s0f0 enp3s0f1
- This would bridge the interfaces enp3s0f0 and enp3s0f1 together.
Here is one more of an more advanced example
# Loopback network interface
auto lo
iface lo inet loopback


# Dynamic IP (DHCP) configuration for eth0
auto etho0
iface eth0 inet dhcp


# Static IP configuration for eth1 (Main interface that needs acces to internet)
# Brings up the interface on start
auto eth1
iface eth1 inet static
    address 192.168.1.20
    netmask 255.255.255.0
    gateway 192.168.1.1
    # The lower the value the higher priority.
    # The interface with the lowest metric value is considered the default for the system
    metric 100
    dns-nameservers 8.8.8.8 8.8.4.4


# Static IP configuration for enp4 (Bakup interface to internet)
# Brings up the interface on start
auto enp4
iface enp4 inet static
    address 192.168.15.35
    netmask 255.255.255.0
    gateway 192.168.15.1
    # The lower the value the higher priority
    metric 500
    dns-nameservers 8.8.8.8 8.8.4.4


# iSCSI interface (internal use, no gateway)
iface enp3s0f2 inet static
    address 10.99.99.60
    netmask 255.255.255.0

# smb interface (internal use, no gateway)
iface enp3s0f3 inet static
    address 10.66.66.120
    netmask 255.255.255.0


# Brings the interface up when detected or hot-plugged to the system
# allow-hotplug sof1
# iface sof1 inet dhcp
Updating the file /etc/network/interfaces
When modifying or updating the file
/etc/network/interfaces
is very important to restart the
networking service
sudo systemctl restart networking
What is networking service
The networking service in Linux is a system service that manages the network interfaces according to the configurations specified in /etc/network/interfaces. It is generally used in systems that rely on traditional network configuration methods (i.e., using ifupdown and /etc/network/interfaces) rather than more modern network management services like NetworkManager.
Here’s a breakdown of what the networking service does and how it relates to your network configuration:
- Purpose of the
networkingService- The
networkingservice is responsible for:- Bringing up and configuring network interfaces (like
eth0,wlan0, etc.) based on the settings in/etc/network/interfaces. - Applying configurations for all network interfaces at boot time.
- Restarting or reinitializing network settings if they are changed in
/etc/network/interfacesand the service is restarted.
- Bringing up and configuring network interfaces (like
- The
- Key Actions of the
networkingService- Start/Stop All Interfaces: When the
networkingservice is started, it reads/etc/network/interfacesand brings up all interfaces configured there. - Restarting to Apply Changes: Restarting the service (e.g.,
sudo systemctl restart networking) re-reads/etc/network/interfacesand reconfigures all interfaces accordingly. This is useful when changes are made to the network configurations, as it reloads the interface settings.
- Start/Stop All Interfaces: When the
- When to Use the
networkingService- During Boot: The
networkingservice is typically started at boot to ensure all interfaces are set up and available for use as soon as the system starts. - After Configuration Changes: If you make changes to
/etc/network/interfaces(for example, changing an IP address, adding a new interface, etc.), you can restart thenetworkingservice to apply those changes across all configured interfaces.
- During Boot: The
- The
networkingService vs. NetworkManager- The
networkingservice and NetworkManager are two different tools for managing network interfaces.networkingService: Works with/etc/network/interfacesand is simpler but less flexible. It’s common in servers and systems that use static configurations and don’t need frequent switching between networks.- NetworkManager: A more feature-rich service that provides a GUI and command-line tools (like
nmcli). It supports dynamic networks, Wi-Fi, VPNs, and multiple profiles for the same interface, making it ideal for desktops and laptops where networks change frequently. - Dependency: The two services are typically not used together, as they can conflict. If NetworkManager is enabled, it may ignore
/etc/network/interfaces, or it may take over certain interfaces, makingnetworkingservice redundant for those.
- The
- Basic Commands for
networkingService Management- Here are the basic systemd commands to manage the
networkingservice:- Start:
sudo systemctl start networking - Stop:
sudo systemctl stop networking - Restart:
sudo systemctl restart networking - Enable at Boot:
sudo systemctl enable networking - Disable:
sudo systemctl disable networking
- Start:
- Here are the basic systemd commands to manage the
Interfaces - Decoding
In order the get all interfaces that the linux kernel regonizes you can run
a)
ip link show
Note 1: This command also exposes the mac address each interface have
Note 2: To get more details about an interfaces, you can also use the command ip addr show
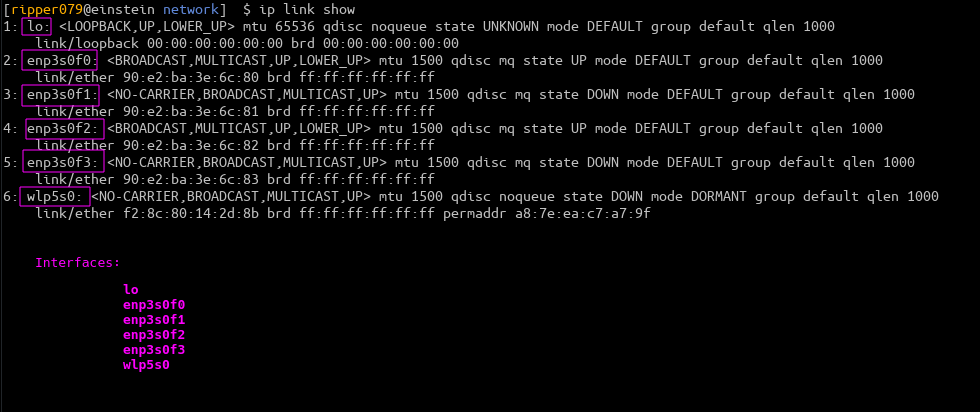
Here you clearly see all interfaces on the system
- lo
- Loopback – It is associated with the IP address 127.0.0.1, commonly referred to as localhost
- enp3s0f0
- en = Ethernet interface
- p3 = The PCI bus number (in this case, bus number 3).
- s0 = The slot number on the PCI bus (in this case, slot 0).
- f0: The function number on the device (often f0 by default, especially if the device has only one function).
- enp3s0f1
- enp3s0f2
- enp3s0f3
- wlp5s0
- wl: Indicates it’s a wireless (Wi-Fi) interface. The prefix wl is used for wireless interfaces.
- p5: Represents the PCI bus number (in this case, bus number 5).
- s0: Indicates the slot number on the PCI bus (slot 0).
Note:This convention provides stable names, even if hardware changes (e.g., adding/removing network cards)
And these are the value that need to be entered in the file
/etc/network/interfaces
b)
ls /sys/class/net/

Interfaces - Activate and deactivate
In order to activate and de-active there is 2 primary commands for this functionality
A) Bring interface down
ifdown
Note:/usr/sbin/ifdown
B) Bring interface up
ifup
Note:/usr/sbin/ifup
When using these 2 command it recommended that the configuration file
/etc/network/interfaces
is set up correct for respective interface. These command may need to have sudo privilegies
Example
Bring UP the interface enp3s0f0
sudo ifup enp3s0f0
Bring DOWN the interface enp3s0f0
sudo ifdown enp3s0f0
Important folder - Used in the ifupdown system
Folder
/etc/network/if-up.d
- Purpose: This directory contains scripts that are executed when a network interface is brought up using the
ifupcommand. - Use Case: You can place custom scripts here that need to run after an interface is activated. For example, you might want to run a script to configure firewall rules or to start specific services that depend on network connectivity.
- Example: If you have a script named
/etc/network/if-up.d/custom-scriptin this directory, it will be executed after the interface comes up:
Folder
/etc/network/if-down.d
- Purpose: This directory contains scripts that are executed when a network interface is brought down using the
ifdowncommand. - Use Case: You can use this for cleanup tasks, such as stopping services or removing firewall rules associated with the interface.
- Example: If you have a script named
/etc/network/if-down.d/cleanup-scriptin this directory, it will be executed when the interface goes down:
Folder
/etc/network/if-pre-up.d
- Purpose: This directory contains scripts that are executed before a network interface is brought up.
- Use Case: This is useful for tasks that need to be completed before the interface is activated, such as configuring system settings or ensuring certain conditions are met.
- Example: A script named
/etc/network/if-pre-up.d/prepare-networkin this directory would run before the interface goes up:
Folder
/etc/network/if-post-down.d
- Purpose: This directory contains scripts that are executed after a network interface is brought down.
- Use Case: Similar to if-down.d, but this runs after the interface has been completely deactivated, allowing for further cleanup or notification tasks.
- Example: A script named
/etc/network/if-post-down.d/notify-downin this directory would run after the interface is down:
Folder
/etc/network/interfaces.d
- Purpose: This directory allows you to organize interface configurations into separate files, rather than having all configurations in a single
/etc/network/interfaces
file. - Use Case: This is particularly useful for systems with many interfaces or for modular configuration. Each file can define settings for one or more interfaces.
- Example: If you have a file named eth0.cfg in this directory, it can contain the configuration for the eth0 interface
Example, the file eth0.cfg could contain the following config for a dhcp solution
auto eth0
iface eth0 inet dhcp
This folder ( /etc/network/interfaces.d )is dependent on the file
/etc/network/interfaces
that a line like
source /etc/network/interfaces.d/*
is present there
Summary
if-up.d: Scripts run after an interface is activated.if-down.d: Scripts run when an interface is deactivated.if-pre-up.d: Scripts run before an interface is activated.if-post-down.d: Scripts run after an interface is deactivated.interfaces.d: Directory for organizing interface configurations into separate files.
directory names .d/
The .d naming convention is referred to as drop-in directories in systemd and other configurations. It is NOT exclusive used by systemd.
They allow to drop in additional configuration files or overrides WITHOUT modifying the main configuration file directly
Some examples of common drop in directories are
/etc/sudoers.d
/etc/apt/sources.list.d
/etc/network/interfaces.d
Folder
They follow this naming convention
- The
.dSuffix- Almost all drop-in directories use a
.dsuffix (likeconf.d,system.d,network.d) to signify they are collections of additional configurations for a primary configuration or system component. - This
.dsuffix convention signals that any files within these directories will extend, modify, or override default settings.
- Almost all drop-in directories use a
- Prefix Numbers for Load Order
- Many drop-in folders use numbered prefixes (e.g.,
10-,50-,99-) to indicate load or application order for configurations, especially if the order matters. Lower numbers load first. - Example:
00-default.confmight hold default configurations, while99-custom.confwould load later and override those defaults if there are conflicting settings.
- Many drop-in folders use numbered prefixes (e.g.,
- Descriptive Names
- Drop-in folders and files often have names reflecting their purpose or the main component they configure.
- Example:
/etc/systemd/system/sshd.service.d/specifically contains configurations for thesshdservice insystemd, while/etc/network/interfaces.d/applies to network interfaces in Debian-based systems
- Common Naming Patterns for Specific Uses
- Configuration (
conf.d): Holds additional configuration files, e.g.,/etc/NetworkManager/conf.d/. - Repositories (
sources.list.dorrepos.d): Defines software repositories, e.g.,/etc/apt/sources.list.d/for APT. - Module or Package Management (
modules.d,load.d): Manages modules or components to load, like/etc/modules-load.d/for kernel modules. - Scripts (
profile.d,bash_completion.d): Defines environment or shell behavior, e.g.,/etc/profile.d/for environment variables.
- Configuration (
Files
How are the files loaded in each drop folder
- Naming Files for Load Order
- Numbered Prefixes: If the directory’s files are loaded sequentially, it’s common to use a numbered prefix to control the order. For example,
10-network.cfgwill load before99-custom.cfg. - Descriptive Names: Some directories don’t require a specific order, so files can be named descriptively, like
my-custom-network.confornetwork.sh.
- Numbered Prefixes: If the directory’s files are loaded sequentially, it’s common to use a numbered prefix to control the order. For example,
- File Types: Configuration Files vs. Scripts
- Configuration Files: Most drop-in directories expect plain text configuration files, often with a
.conf,.cfg, or.listextension. For example:.conf(for config files) is used in/etc/sysctl.d/,/etc/systemd/system/, and/etc/modprobe.d/..list(for list files) is common in/etc/apt/sources.list.d/.
- Scripts: Some drop-in directories are meant for shell scripts (e.g.,
/etc/profile.d/for setting environment variables).- Naming for scripts: Shell scripts are often named with a
.shextension, likecustom_env.shin/etc/profile.d/.
- Naming for scripts: Shell scripts are often named with a
- Permissions: For scripts to be executable, they must have appropriate permissions (e.g.,
chmod +x).
- Configuration Files: Most drop-in directories expect plain text configuration files, often with a
- File Content Requirements by Directory
- Syntax: Files in drop-in directories need to follow the syntax expected by the service or tool reading them. For example:
- Network configurations in /etc/network/interfaces.d/ follow the interfaces syntax for Debian.
- systemd drop-ins in
/etc/systemd/system/*.d/use the[Section]format (like[Service]or[Unit]).
- Limitations: Only include relevant settings for the specific service. Unsupported syntax or unrelated configurations can cause errors.
- Syntax: Files in drop-in directories need to follow the syntax expected by the service or tool reading them. For example:
Usually does the configuration files extend or override specific part of a main config file. The benefit of of this is that the main config file stays unchanged/unmodified.
All files within a folder and a single file within the folder
Note:Sometimes the main config file need to be explicit sourcing with source /etc/network/interfaces.d/* OR source /etc/network/interfaces.d/specific-interface.cfg
Network Mangagers - Fundamentals
The most common
Network Managers
NetworkManager
systemd-networkd
NetworkManager- Designed for desktop environments and is widely used in distributions that focus on user-friendliness.
- It provides a graphical interface (like
nm-connection-editor) and command-line tools (nmcliandnmtui) for managing network connections. - Supports various network types, including wired, wireless, VPN, and mobile broadband.
systemd-networkd- A part of the systemd suite, it is more lightweight and is typically used in server environments or for embedded systems.
- It operates using configuration files located in
/etc/systemd/network/and is managed through the command line. - Better suited for environments where a minimal setup is preferred without the overhead of a graphical interface.
In many cases, users will choose
NetworkManager for desktops
and
systemd-networkd for servers
Check status for NetworkManager with systemd with
systemctl status NetworkManager

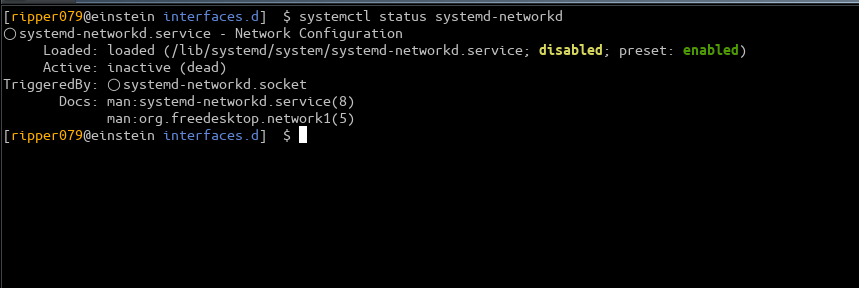
Check status for systemd-networkd with systemd with
systemctl status systemd-networkd
Here we will cover
NetworkManager
When using NetworkManager we usually do not rely on the file content
/etc/network/interfaces
and this file is typically commented out or not present.
Insteed we are using the tools
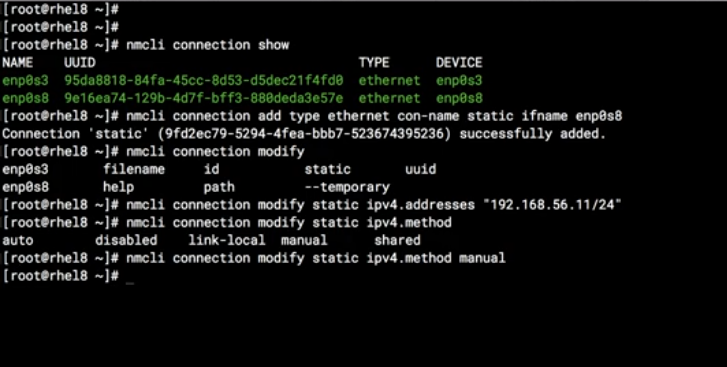
nmcli
This is cli tool that versatible and powerful for scripting and automation. This gives the most flexibility and power
Note: /usr/bin/nmcli
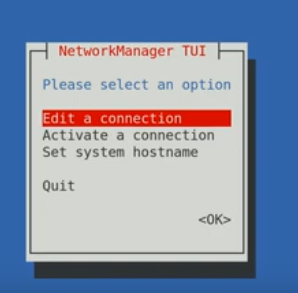
nmtui
A menu-driven interface that is more user-friendly. More of a visual method of interaction, and more suitable for people who is not confortable with command syntax
Note: /usr/bin/nmtui
nmcli
nmtui
There is also a graphical GNOME environment that handles the network connection. This is suitable to for beginner, but we will not cover that here. There will also be an icon in the system tray where you can manage connection.
nmcli – General commands
device
List or view all network Devices
nmcli device status
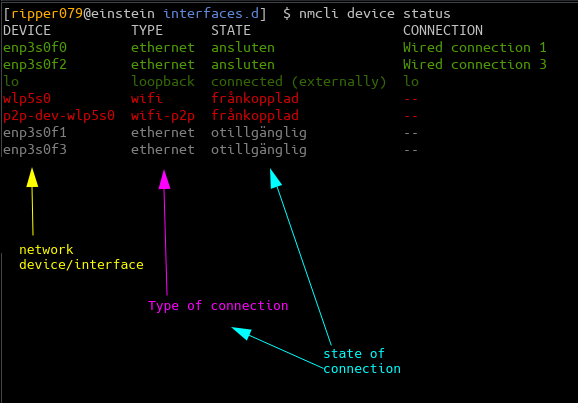
View Device Information, in this case for device enp3s0f0
nmcli device show enp3s0f0
Deactivate the device enp3s0f0
nmcli device disconnect enp3s0f0
Activate the device enp3s0f0
nmcli device connect enp3s0f0
connection
List All Connections
nmcli connection show
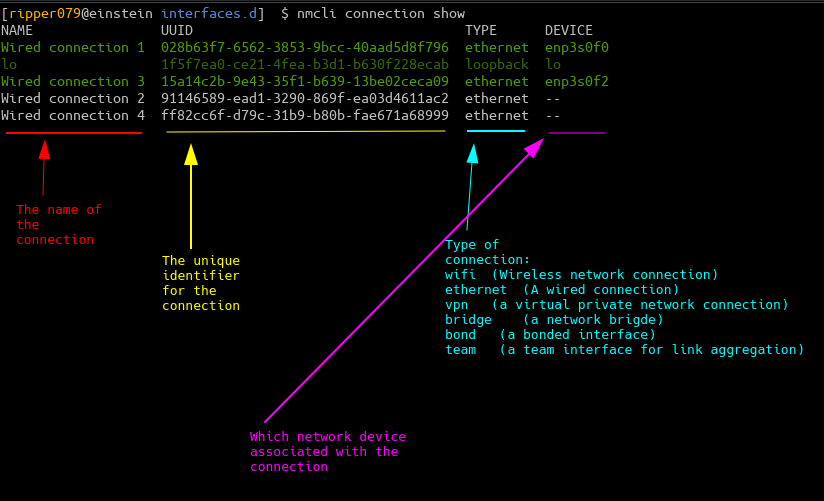
Show Details of a Specific Connection
nmcli connection show "Wired connection 1"
Note: The connection name is also the profile name
All connections are saved as profiles
Activates the connection my-static-connection
nmcli connection up my-static-connection
DE-activates the connection my-static-connection
nmcli connection down my-static-connection
Delete Remove the connection my-static-connection
nmcli connection delete my-static-connection
nmcli - setup a connection
Wired Connection
First step is to activate a device, in this case enp3s0f0
nmcli device connect enp3s0f0
a) Add manual connections WITHOUT DHCP server
nmcli connection add type ethernet ifname eth0 con-name my-static-connection ipv4.method manual ipv4.addresses 192.168.1.10/24 ipv4.gateway 192.168.1.1 ipv4.dns 8.8.8.8

And now we need to activate the connection with
nmcli connection up my-static-connection
b) A connections WITH a DHCP server
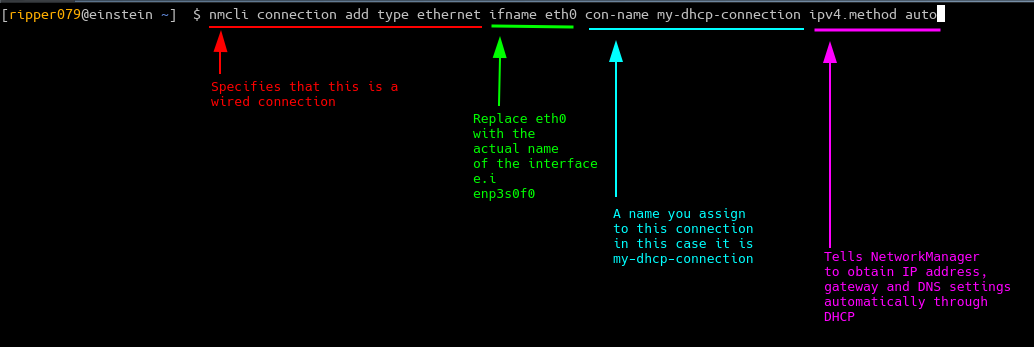
And now we need to activate the connection with
nmcli connection up my-dhcp-connection
Modify a connection
Modifies the wired connection my-static-connection to a new ip ver4 adress, gateway address and dns server
nmcli connection modify my-static-connection ipv4.addresses 10.10.10.120/24 ipv4.gateway 10.10.10.1 ipv4.dns 1.1.1.1
Remove a connection
Removes the wired connection my-static-connection
nmcli connection delete my-static-connection
Advanced settings
Bonding (Link aggregating)
The steps to create a bonding is
1. Create a Link aggregation in this case using LACP
nmcli connection add type bond ifname bond0 mode 802.3ad
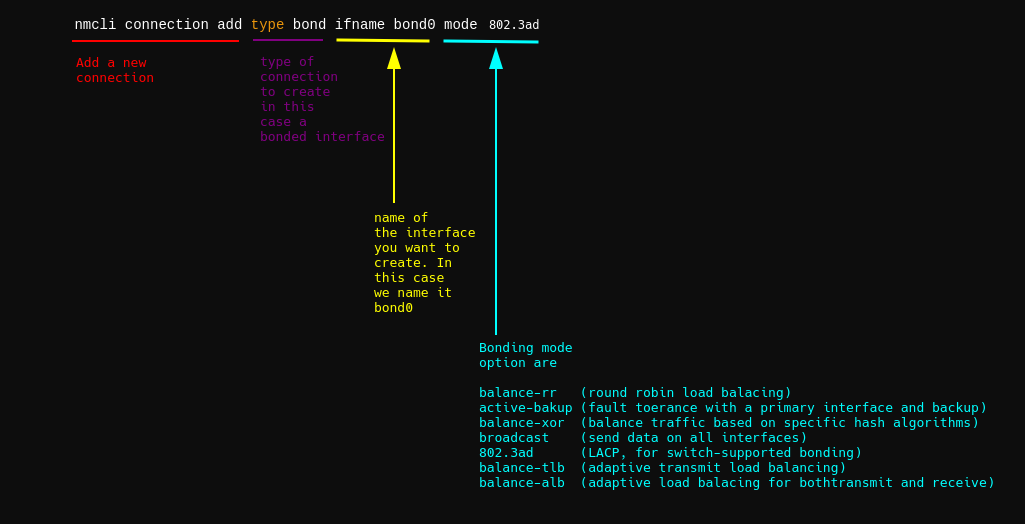
2. Next step you need to add the slave interfaces (the physical interfaces to be bonded), in this case eth0 and eth1
nmcli connection add type ethernet ifname eth0 master bond0
nmcli connection add type ethernet ifname eth1 master bond0

3. Once bounded, network manager treat bond0 as a single interface. Now you need to assign ip address and activate the interface
a) Set ip from dhcp
nmcli connection modify bond0 ipv4.method auto
Note:Static ip address can be nmcli connection modify bond0 ipv4.method manual ipv4.addresses 192.168.1.10/24 ipv4.gateway 192.168.1.1 ipv4.dns "8.8.8.8 8.8.4.4"
b) Activate the interface
nmcli connection up bond0
Wireless connection
a) First step is to actually determine which device/interface is used for the wifi connection
nmcli device status
Usually the returned value would be something like wlp5s0
b) List Available Wi-Fi Networks
nmcli device wifi list
c) Create a connection, wifi home-wifi and save it to profile Office Connection. By default NetworkManager actually obtains ip, default gateway, dns info through dhcp
nmcli device wifi connect home-wifi password asDF1256%& ifname wlp5s0 name "Office Connection"
d) Optional if you could modify it into a static ip
nmcli connection modify "Office Connection" ipv4.method manual ipv4.addresses 192.168.1.100/24 ipv4.gateway 192.168.1.1 ipv4.dns 8.8.8.8
e) Or back to a dhcp
nmcli connection modify "Office Connection" ipv4.method auto
f) But after creating a connection it good practice to connect again (especially with many profiles), in this case connect to the Office Connection profile
nmcli connection up "Office Connection"
Note The profile name has NOTHING to do with the SSID of the network you want to connect to
Activate (or bring up) a connection
To connect/activate to the connection (or rather the profile), “Office Connection”
nmcli connection up "Office Connection"
De-activate (or bring down) a connection
To disconnect/de-activate to the connection (or rather the profile), “Office Connection”
nmcli connection down "Office Connection"
Advanced settings
Network Metrics
This is a good setting to make when having multiple interfaces. This set which connection is preferred and will will take precedence (lower means that is has higher priority). The lower metric value is the default route.
nmcli connection modify "Office Connection" ipv4.route-metric 50
nmcli connection modify "my-dhcp-connection" ipv4.route-metric 100
In this case the “Office Connection” will take precedence and will be used as the first option
Note:Network Metrics is applied to connections
Termomonlogy and Concept
Key Concepts
- Device Presence:
- This refers to whether the network interface (like an Ethernet NIC or Wi-Fi card) is physically available and recognized by the system. For example, if your laptop has a Wi-Fi card, it will show up as a device (e.g.,
wlan0) innmcli device status. - A device can be present but not connected to any network.
- This refers to whether the network interface (like an Ethernet NIC or Wi-Fi card) is physically available and recognized by the system. For example, if your laptop has a Wi-Fi card, it will show up as a device (e.g.,
- Connecting a Device:
- Connecting means initiating the process of linking the device to a network.
- For wired connections, this typically means ensuring that the Ethernet cable is plugged into the NIC and that the connection is established with the network.
- For wireless connections, connecting involves associating with a specific Wi-Fi network (SSID) and often requires entering a password if it is secured.
- Activate and Deactivate:
- Activate: This is essentially what happens when you connect a device. It allows the device to communicate with the network.
- Deactivate: This command would essentially disconnect the device from any network. For example, you can deactivate a Wi-Fi device if you want to stop it from connecting to networks.
Example Scenarios
- Ethernet Connection:
- If you have an Ethernet card (e.g.,
eth0), it needs to be plugged into a network (like a router). - Running
nmcli device connect eth0tells NetworkManager to establish the connection using that device. - If the Ethernet cable is unplugged, the device is present, but you can’t connect to any network until the cable is plugged in.
- If you have an Ethernet card (e.g.,
- Wi-Fi Connection:
- If you have a Wi-Fi card (e.g.,
wlan0), it can be present but not connected to a network. - You can run
nmcli device connect wlan0, which activates the device. - However, if you haven’t specified a Wi-Fi network to connect to (e.g., using
nmcli device wifi connect <SSID>), it won’t actually connect to a Wi-Fi network, even though the device is activated.
- If you have a Wi-Fi card (e.g.,
Summary
- Device Present: The NIC or Wi-Fi card is physically there and recognized by the system.
- Connect: Telling the system to start the connection process to a network using that device.
- Activate/Deactivate: Changing the state of the device to allow or disallow network communications.
FAQ
Autoconnect Priority vs Network Metrics
- Autoconnect Priority
- Purpose: Determines the order in which NetworkManager attempts to connect to available connections for a specific device.
- Scope: This is set per connection profile and applies only when multiple profiles are available for the same network interface.
- Usage: If you have multiple saved Wi-Fi connections for a wireless device, the profile with the highest autoconnect priority (set by
connection.autoconnect-priority) will be tried first. A higher value means a higher priority. - Example: If two Wi-Fi networks are available, and profile A has an autoconnect priority of 10 while profile B has 5, NetworkManager will first attempt to connect to profile A.
- Network Metrics
- Purpose: Helps NetworkManager decide the quality and preference of routes for IP traffic across different interfaces (e.g., if both Wi-Fi and Ethernet are connected, which should handle traffic).
- Scope: This applies across different network interfaces (e.g., Ethernet, Wi-Fi, cellular) and impacts routing decisions rather than connection priority.
- Usage: Lower metrics values indicate a more preferred or “higher quality” route. For example, Ethernet connections usually have a lower metric than Wi-Fi, making them preferred by default for routing traffic.
- Example: If both Wi-Fi and Ethernet are connected, NetworkManager will typically prefer Ethernet because it has a default lower metric, suggesting a more stable, faster connection.
How They Work Together
- Autoconnect priority determines which profile to connect to when there are multiple choices for the same device.
- Network metrics help NetworkManager decide which active network interface to use for routing traffic when multiple interfaces are connected.
Setting Each Property
- To set autoconnect priority:
- nmcli connection modify connection-name connection.autoconnect-priority 10
- To set network metric:
- nmcli connection modify connection-name ipv4.route-metric 500
Disable autoconnect for connections i networkManager
2 way of achieving this
a) disable a specific connection
nmcli connection modify connection-name connection.autoconnect no
You will need to bring up each connection manually
nmcli connection up connection-name
b) Globally disable autoconnect in file /etc/NetworkManager/NetworkManager.conf
Add to the line
[main]
no-auto-default=*
Connectivity
One tool for actually testing the connectivity is ping
Default use
ping google.com
Use a specific interface, call it with an source ip
ping -I 10.29.29.30 google.com
Performance
TODO
TODO
TODO
Nice program called iperf
Make sure they are the same version!!!!
On server side
iperf -s
On client side
iperf -c [ip.adress.your.server]

