MySQL
What is MySQL
MySQL stands as a cornerstone in the realm of relational database management systems (RDBMS), providing a robust platform for storing, managing, and retrieving data through the use of Structured Query Language (SQL). Originally developed by MySQL AB, it has since become an essential component in countless web applications, powering everything from small blogs to large-scale e-commerce platforms. Renowned for its speed, reliability, and ease of use, MySQL offers a rich set of features including comprehensive transaction support, ACID compliance, and various storage engines catering to diverse requirements.
In parallel to MySQL’s evolution, MariaDB emerged as a significant player in the open-source database landscape. Stemming from concerns about Oracle’s acquisition of MySQL, MariaDB was conceived as a community-developed fork led by the original creators of MySQL. MariaDB not only strives to maintain compatibility with MySQL but also introduces enhancements and innovations to address emerging needs in data management. With its commitment to openness, performance, and community-driven development, MariaDB has garnered its own dedicated following, serving as a compelling alternative for those seeking an RDBMS solution with a strong emphasis on freedom and collaboration.
The competition and collaboration between MySQL and MariaDB have contributed to the continuous evolution of both platforms, fostering innovation and driving improvements in database technology. As organizations navigate the complexities of modern data management, they have the flexibility to choose between MySQL and MariaDB based on factors such as licensing preferences, feature requirements, and community support. Regardless of the choice, both MySQL and MariaDB remain pivotal players in the ever-expanding landscape of relational database solutions, empowering businesses and developers alike to build scalable and reliable applications.
Database server hosts one or more databases
Each database contains multiple tables
Tables are made up by rows and columns. The table is constructed with a schema which outlaws the structure of the table, including the names and data types of its columns, constraints, indexes, and other attributes
The default port for mysql/mariadb is 3306
This article is for mysql version 8

How to install mysql
Preparation
sudo apt update && apt upgrade -y
If the database should reside on a dedicated server
Change the hostname from localhost to something else e.i the same as the domain name you registrated in step 2 (preferrable – not required but something descriptive)
sudo nano /etc/hostname
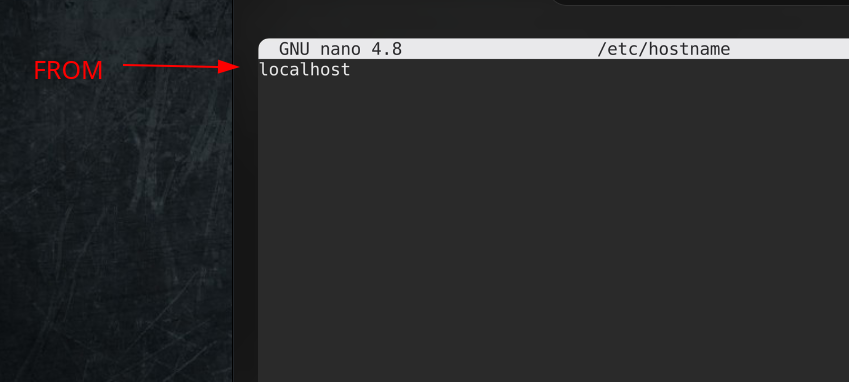
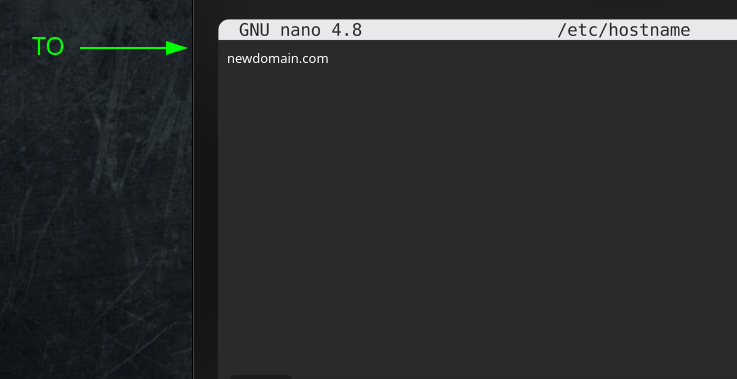
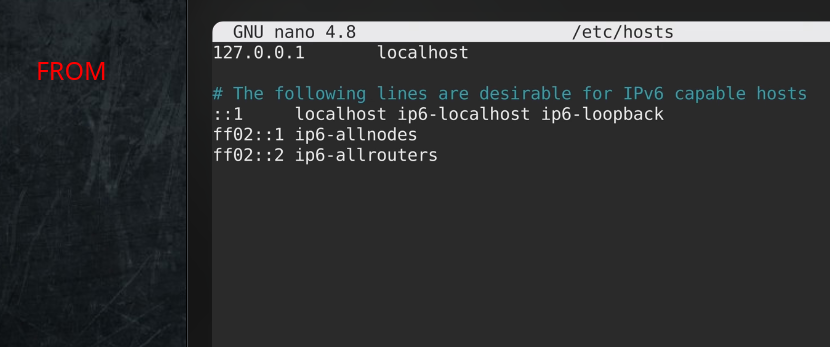
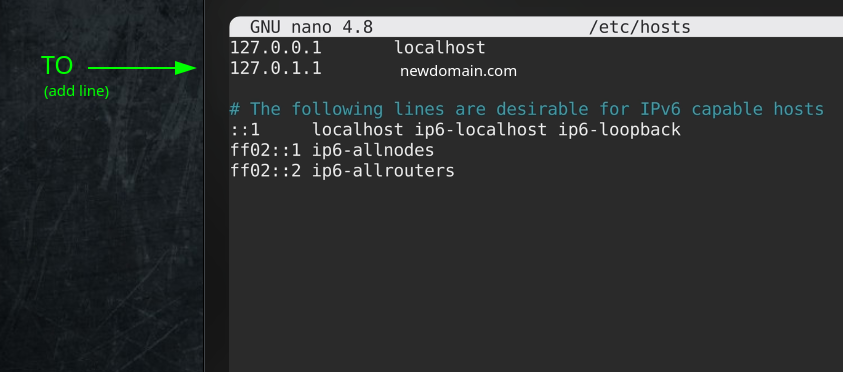
6. Change host to reflect this by adding a new line
sudo nano /etc/hosts
Reboot the server
sudo systemctl reboot
Verify that hostname has changed (Do NOT rely on prompt)
hostname
OR
hostname -I
Now install the packages. This will cover only the server side
1.MySQL server
sudo apt install default-mysql-server
2. Verify that the MYSQL server was installed
mysql --version OR mysql -V
OR
Verify that the MAriaDB server was installed
mariadb --version OR mariadb -V
3. Verify the service is up and running
sudo systemctl status mysql OR sudo systemctl status mysql
Termomonlogy and Concept
Database: A structured collection of data organized for efficient retrieval.Table: A structured representation of data in rows and columns within a database.Row: A single record in a database table containing data related to a specific entity.Column: Also known as a field, it represents a single attribute of a record in a database table.Primary Key: A unique identifier for each record in a table, used to ensure data integrity and facilitate fast data retrieval.Foreign Key: A field in one table that refers to the primary key in another table, establishing a relationship between the two tables.Index: A data structure that improves the speed of data retrieval operations on a database table.Query: A request for data or information from a database, typically written in SQL (Structured Query Language).SQL (Structured Query Language): A domain-specific language used for managing and manipulating relational databases.Transaction: A logical unit of work that contains one or more database operations, typically grouped together to ensure data consistency and integrity.ACID: An acronym representing the properties of a transaction in a database system: Atomicity, Consistency, Isolation, and Durability.Backup: A copy of data stored in a separate location to protect against data loss or corruption.Replication: The process of copying and maintaining identical sets of data across multiple database servers to improve reliability and performance.Stored Procedure: A precompiled collection of SQL statements stored in the database and executed as a single unit.Trigger: A database object that automatically executes in response to specified events, such as insertions, updates, or deletions in a table.View: A virtual table created by a query, allowing users to retrieve and manipulate data without altering the underlying database tables.Normalization: The process of organizing data in a database to reduce redundancy and improve data integrity.Denormalization: The opposite of normalization, where redundant data is intentionally introduced to improve query performance.User: An individual or application that interacts with a database, typically with specific permissions and access rights.Privileges: Permissions granted to users to perform specific actions on database objects, such as querying, updating, or deleting data.Granting: When a database user is gett(adding) some privieg(es)Revoke: When a database user is removed(delete) some privieg(es)
The First Login after a MySQL Server installation
This may differ across but the first step is
1. SSH into the server
2a) The default account after a server installation (this may differ versions)
mysql -u root -p
Password empty
Simply b)
mysql
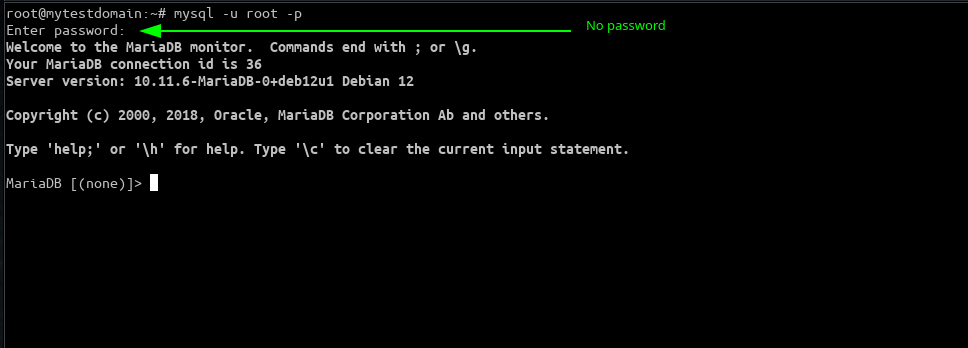
Successful Login!
Folder/files structure and configuration - SERVER side
- Configuration Files:
- MySQL:
/etc/mysql/my.cnfor/etc/my.cnf: The main configuration file for MySQLL/MariaDB. It contains global configuration options that apply to all MySQL/MariaDB clients and servers
- MariaDB:
/etc/mysql/mariadb.conf.d/: Directory containing individual configuration files for MariaDB./etc/mysql/mariadb.conf.d/mysql.cnf: A configuration file specific to the MySQL/MariaDB server/etc/mysql/mariadb.conf.d/client.cnf: A configuration file specific to MySQL/MariaDB clients/etc/mysql/mariadb.conf.d/mysqldump.cnfA configuration file specific to the mysqldump utility./etc/mysql/debian.cnf: A configuration file specific to Debian
/etc/mysql/my.cnf.d/: Similar to MariaDB, directory for configuration files in MySQL 5.7 and later versions.
/etc/mysql/debian.cnf: A configuration file used by the Debian system scripts to automatically configure MySQL/MariaDB.
- MySQL:
- Data Directory:
- MySQL:
/var/lib/mysql/: Default location where MySQL stores its databases and related files.
- MariaDB:
/var/lib/mysql/: Same as MySQL, where MariaDB stores its databases and data files.
- MySQL:
- Log Files – Usually not enabled by default:
- MySQL:
/var/log/mysql/error.log: MySQL error log file./var/log/mysql/mysql.log: MySQL general query log file (if enabled).
- MariaDB:
/var/log/mysql/error.log: MariaDB error log file./var/log/mysql/mariadb.log: MariaDB general query log file (if enabled).
- MySQL:
- Socket and PID Files:
- MySQL:
/var/run/mysqld/mysqld.sock: MySQL socket file./var/run/mysqld/mysqld.pid: MySQL process ID (PID) file.
- MariaDB:
/var/run/mysqld/mysqld.sock: MariaDB socket file./var/run/mysqld/mysqld.pid: MariaDB process ID (PID) file.
- MySQL:
- Executable and Binary Files:
- MySQL:
/usr/sbin/mysqld: MySQL server executable./usr/bin/mysql: MySQL client executable.
- MariaDB:
/usr/sbin/mysqld: MariaDB server executable./usr/bin/mysql: MariaDB client executable.
- MySQL:
- Plugin Directory:
- MySQL:
/usr/lib/mysql/plugin/: Directory containing MySQL plugins.
- MariaDB:
/usr/lib/mariadb/plugin/: Directory containing MariaDB plugins.
- MySQL:
- Scripts and Utilities:
- MySQL:
/usr/bin/mysqladmin: Utility for administering MySQL server./usr/bin/mysqlcheck: Utility for checking MySQL tables for errors.
- MariaDB:
/usr/bin/mysqladmin: Same as MySQL, utility for administering MariaDB server./usr/bin/mysqlcheck: Same as MySQL, utility for checking MariaDB tables.
- MySQL:
Commands - Login
In the operating shell

| DESCRIPTION | COMMAND |
|---|---|
|
Connect to a MySQL/MariaDB server with the specified hostname or IP address, port number, username, and optionally the database |
mysql -h [hostname_or_ip] -P [portnumber] -u [username] -p [database] |
|
Login with username The default command You will be prompted to enter password OR |
mysql -u [username] -p |
|
Login with username The default command You will be prompted to enter password |
mariadb -u [username] -p |
|
Login with root You will be prompted to enter password OR |
mysql -u root-p |
|
Login with root You will be prompted to enter password |
mariadb -u root-p |
|
You can also specify the database to which you want to connect upon login |
mysql -u username -p database_name |
After a succesful login you will be greated by the MySQL client shell or the MariaDB client shell
Commands - User and Privileges management
MySQL client shell
OR
MariaDB client shell
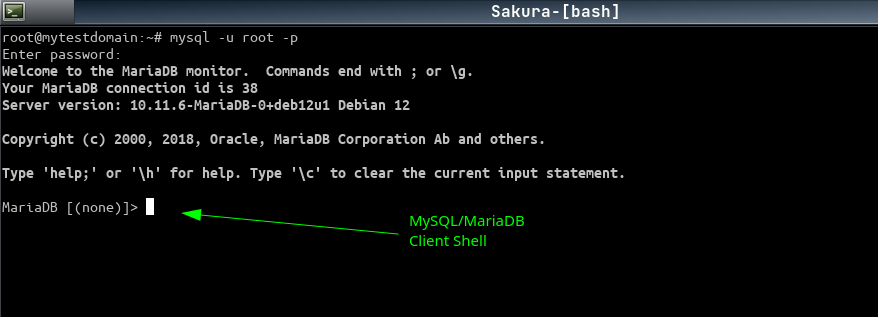
User management
When creating a user in MySQL, access rights are indeed determined not only by the username and password but also by the host from which the user is connecting. This adds an additional layer of security and control over who can access the MySQL server from which locations.
Here’s how it works:
Username and Password: Each user in MySQL is associated with a username and a password. These credentials are used to authenticate the user when connecting to the MySQL server.Host: In addition to the username and password, MySQL also considers the host from which the user is connecting. This host can be specified as part of the user creation process and defines from which locations (IP addresses or hostnames) the user is allowed to connect.- ‘localhost‘: This host refers to connections originating from the same machine where the MySQL server is running. Users created with the ‘localhost’ host can only connect locally.
- ‘%‘ (Wildcard): This host allows connections from any remote host. It’s a wildcard that matches any hostname. However, it’s less secure because it grants access from any location.
- Specific IP Address or Hostname: You can also specify a specific IP address or hostname to restrict access to connections originating from a particular location.
By default, MySQL creates a root user with full administrative privileges that can connect from ‘localhost’. This user is typically used for administrative tasks performed on the local machine where MySQL is installed.
When creating additional users, you have the option to specify the username, password, and host from which they are allowed to connect. This allows you to control access to the MySQL server based on the source of the connection, adding an extra layer of security to your database system.
Privileges management
In MySQL, privileges control what actions a user can perform on specific databases, tables, or other database objects. When creating a user, you can assign specific privileges to that user, defining exactly what they are allowed to do within the MySQL server.
Here’s how it works:
Global Privileges: These privileges apply to the entire MySQL server and are granted using theGRANTstatement without specifying a specific database or table. Some common global privileges include:CREATE USER: Allows the user to create and delete other users.CREATE DATABASE: Allows the user to create and delete databases.RELOAD: Allows the user to execute theFLUSHstatement to reload server settings or clear caches.SHUTDOWN: Allows the user to shut down the MySQL server.
Database-Level Privileges: These privileges apply to specific databases and are granted using theGRANTstatement with the database name specified. Common database-level privileges include:SELECT: Allows the user to retrieve data from tables in the specified database.INSERT: Allows the user to insert new rows into tables in the specified database.UPDATE: Allows the user to modify existing rows in tables in the specified database.DELETE: Allows the user to remove rows from tables in the specified database.
Table-Level Privileges: These privileges apply to specific tables within a database and are granted using theGRANTstatement with the table name specified. Common table-level privileges include:SELECT: Allows the user to retrieve data from the specified table.INSERT: Allows the user to insert new rows into the specified table.UPDATE: Allows the user to modify existing rows in the specified table.DELETE: Allows the user to remove rows from the specified table.
Column-Level Privileges: MySQL does not directly support column-level privileges. However, you can achieve similar functionality by using views or stored procedures to restrict access to specific columns within a table.
When creating a user, you can grant them specific privileges at the global, database, or table level, allowing you to control exactly what actions they can perform within the MySQL server. This fine-grained control over privileges helps to ensure data security and integrity within your database system.
Create a user with all privileges aka god
Again, remember this has to be done through the MySQL/MariaDB client shell
1. Create the user pellekung with password 12345 that can connect from ANY host(ip adress)
CREATE USER 'pellekung'@'%' IDENTIFIED BY '12345';
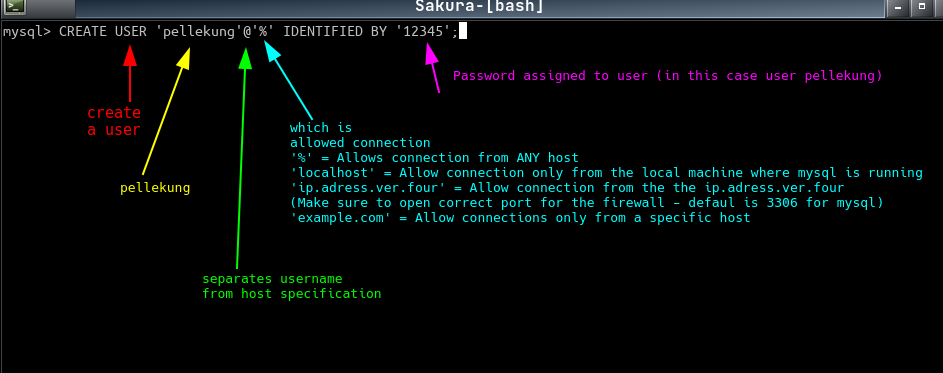
Note: When creating a user with % (allowed connection) that user is NOT permitted to connected from localhost…oddly. Could be wise to create 2 user for debugging correctly
2. Grant that user with ALL privileges
GRANT ALL PRIVILEGES ON *.* TO 'pellekung'@'%';
* = database
* = table
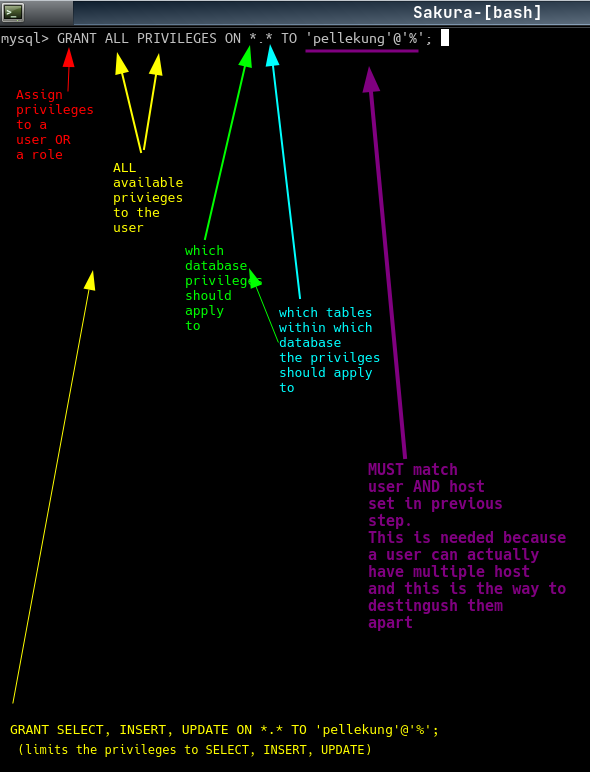
3. Flush the privileges to ensure that changes take effect
FLUSH PRIVILEGES;
Note: mysql uses the port 3306 by default with the protocol tcp
Commands - User and Privileges Management
In the operating shell
| DESCRIPTION | COMMAND |
|---|---|
|
Info about currently authenticated user (as specified in the connection attempt) |
SELECT USER(); |
|
Info about currently authenticated user (If you connect as 'john'@'localhost' but have privileges to access MySQL as 'john'@'%', CURRENT_USER() would return 'john'@'%' ) |
SELECT CURRENT_USER(); |
|
Info about all authenticated logged in users |
SELECT USER, HOST, DB, COMMAND FROM information_schema.PROCESSLIST WHERE user IS NOT NULL; |
| Displays all users and privilegies | SELECT User, Host FROM mysql.user; |
|
Display the privileges granted to the MySQL user 'pellekung' when connecting from any host ('%') |
SHOW GRANTS FOR 'pellekung'@'%'; |
|
Set new password for user 'pellekung'@'%' OR |
SET PASSWORD FOR 'pellekung'@'%' = PASSWORD('new_password'); FLUSH PRIVILEGES; |
|
Set new password for user 'pellekung'@'%' |
ALTER USER 'pellekung'@'%' IDENTIFIED BY "new_password"; FLUSH PRIVILEGES; |
|
Delete the user danne at host localhost and flush so that changes take affect |
DROP USER 'danne'@'localhost' ; FLUSH PRIVILEGES; |
|
Revoke all privileges for `hunden`@`localhost` OR |
REVOKE ALL PRIVILEGES ON *.* FROM 'hunden'@'localhost'; FLUSH PRIVILEGES; |
|
Revoke all privileges for `hunden`@`localhost` AND prevents the user from granting privileges to other users |
REVOKE ALL PRIVILEGES, GRANT OPTION FROM 'hunden'@'localhost'; FLUSH PRIVILEGES; |
Commands - Managing Databases and Tables
MySQL client shell
OR
MariaDB client shell
Here is an example of creating a database and table to it
Caution – (Sometimes when using copy and paste of the below code the shell formats it as bak-ticks. It should be single quotes)
— START OF CODE
— Create the car_inventory database
CREATE DATABASE IF NOT EXISTS car_inventory;
— Select that database
USE car_inventory;
— Create the cars table to store basic car information
CREATE TABLE IF NOT EXISTS cars (
id INT AUTO_INCREMENT PRIMARY KEY,
make VARCHAR(50),
model VARCHAR(50),
year INT,
price DECIMAL(10, 2)
);
— Create the car_details table to store additional details about each car
CREATE TABLE IF NOT EXISTS car_details (
id INT AUTO_INCREMENT PRIMARY KEY,
car_id INT,
color VARCHAR(50),
mileage INT,
FOREIGN KEY (car_id) REFERENCES cars(id) ON DELETE CASCADE
);
— Insert example data into the cars table
INSERT INTO cars (make, model, year, price) VALUES
(‘Toyota’, ‘Camry’, 2019, 25000.00),
(‘Honda’, ‘Civic’, 2018, 22000.00),
(‘Ford’, ‘Mustang’, 2020, 35000.00),
(‘Chevrolet’, ‘Cruze’, 2017, 18000.00),
(‘BMW’, ‘X5’, 2021, 50000.00);
— Insert example data into the car_details table
INSERT INTO car_details (car_id, color, mileage) VALUES
(1, ‘Blue’, 15000),
(2, ‘Red’, 20000),
(3, ‘Black’, 10000),
(4, ‘Silver’, 30000),
(5, ‘White’, 5000);
— END OF CODE
And deleting(aka drop) the database
— START OF CODE
DROP DATABASE IF EXISTS car_inventory;
— END OF CODE

| DESCRIPTION | COMMAND |
|---|---|
| Show all databases | SHOW DATABASES; |
|
Select a database Need to be done before you can interact with it |
USE [databasename]; |
|
Show tables within database Caution - You need to be inside a database prior to this command Se previous command in this list |
SHOW TABLES; |
|
Create a database named car_inventory; |
CREATE DATABASE car_inventory; |
|
Create a database named car_inventory if it not already exists |
CREATE DATABASE IF NOT EXISTS car_inventory; |
|
Delete aka Drop the database car_inventory |
DROP DATABASE IF EXISTS car_inventory; |
|
Restore a database from file backup_file.sql Note you need to manually create a database prior of this command AND also be inside that database with the USE statement prior to executing this command inside Mysql/mariadb client prompt |
source /path/to/your/backup_file.sql |
|
Create a dump bakup of an existing database named [databasename] Wordpress way |
mysqldump -u username -p --add-drop-table [existing_database_name] > backup_wordpress.sql |
|
Create a dump bakup of an existing database named [databasename] (including stored routines, triggers, events and data ) (This creates a file e.i clone_site_dev_db.sql) P.S The user needs to correct privileges in order to finish this operation This has to be done at the OS Shell prompt |
mysqldump -u [username] -p --routines --triggers --events [databasename] > clone_site_dev_db.sql |
|
Create a bakup of an existing database (This creates a file e.i bakup_cars.sql>) P.S The user needs to correct privileges in order to finish this operation This has to be done at the OS Shell prompt |
mysqldump -u username -p [existing_database_name] > bakup_cars.sql |
|
Restore a database from file bakup_cars.sql Note you need to manually create a database prior of this command. Need to be the same name, in this case [new_database_cloned] This has to be done at the OS Shell prompt |
mysql -u username -p [new_database_cloned] < bakup_cars.sql |
Commands - Misc
| DESCRIPTION | COMMAND |
|---|---|
|
Logout form mysql/mariadb shell OR |
exit; |
| Logout form mysql/mariadb shell | quit; |
|
real-time information about the active processes details as user executing each process, the database involved, the type of command being executed, and other relevant information. |
SELECT ID, USER, DB, COMMAND, TIME, STATE, INFO FROM information_schema.PROCESSLIST; |
| View currently executing queries in MySQL | SHOW FULL PROCESSLIST; |
Setting up for remote access
Server files
Usually the configuration file will reside inside /etc/mysql folder
The main file for configuration is my.cnf
They may be some variation to this like when system.d takes control, take a loot inside that folder
On debian there are 2 folder that are instresting for this purpose
The Server configuration
/etc/mysql/mariadb.conf.d
In order for the server to accept connections from remote sources you need specify this in the configuration file. In debian this is the
/etc/mysql/mariadb.conf.d/50-server.cnf
Where this config option for bind needs to be added/modified.
Here is an example of that
[mysqld]

# Default port number

# port = 3306

# bind-address = 127.0.0.1

# Allow to connect from any host

bind-address = 0.0.0.0

#datadir = /var/lib/mysql

# Auth with with user/password

default_authentication_plugin = mysql_native_password

#max_connections = 200
Also setting auth to basic auth here. Username/Passwork. You need to set up that user in mysql that way to
You will need to restart the server for this to take affect
sudo systemctl restart mysql
OR
sudo systemctl restart mariadb
Client files
Usually the configuration file will reside inside /etc/mysql folder
The main file for configuration is my.cnf
They may be some variation to this like when system.d takes control, take a loot inside that folder
On debian there are 2 folder that are instresting for this purpose
The Client configuration
/etc/mysql/conf.d
USUALLY you do not need to do anything here. In the client config file you regulate what user interact with mysql when logged in to the server

