SSH - Secure SHell
What is ssh
SSH, or Secure Shell, is a cryptographic network protocol that facilitates secure communication and remote access between computers over unsecured networks. It provides a secure channel for accessing and managing remote systems, encrypting data transmission to prevent interception and tampering. SSH ensures confidentiality, integrity, and authenticity of transmitted data through encryption techniques, authentication mechanisms, and digital signatures. Its primary use cases include remote command-line login, secure file transfer, and tunneling connections for accessing services securely. By employing robust encryption and authentication methods, SSH enables users to securely interact with remote systems, making it an essential tool for system administrators, developers, and anyone requiring secure remote access to computers and network devices. Runs on port 22 (this can be changed by user)
Replaces telnet (no encryption at all)


Advantages with ssh
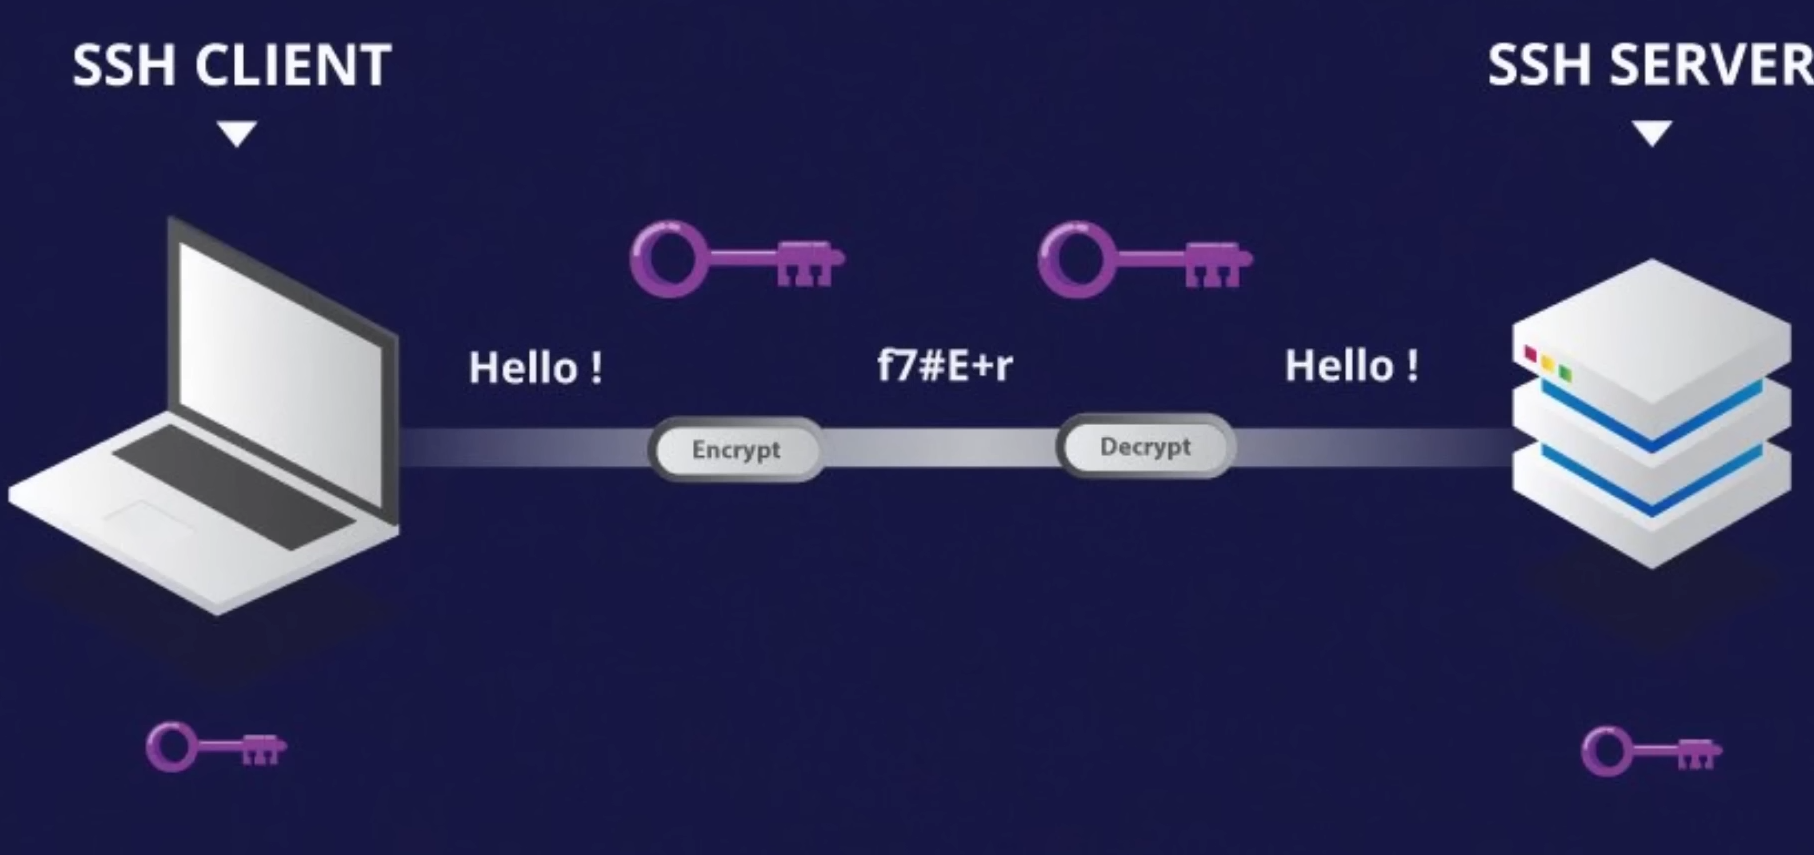
- Security: SSH encrypts all data transmitted between the client and server, providing a secure channel even over unsecured networks like the internet. This encryption prevents eavesdropping, interception, and tampering of sensitive information, ensuring confidentiality and integrity.
- Authentication: SSH supports various authentication methods, including password-based authentication and public-key cryptography. Public-key authentication, in particular, offers stronger security by eliminating the need to transmit passwords over the network and mitigating risks associated with password-based attacks.
- Remote Access: SSH allows users to securely access and manage remote systems’ command-line interfaces from anywhere with network connectivity. This enables system administrators to perform tasks such as configuration, troubleshooting, and software updates without physically being present at the remote location.
- File Transfer: SSH includes protocols like SCP (Secure Copy Protocol) and SFTP (SSH File Transfer Protocol) for secure file transfer between hosts. These protocols provide encrypted file transfer capabilities similar to traditional FTP but with enhanced security features.
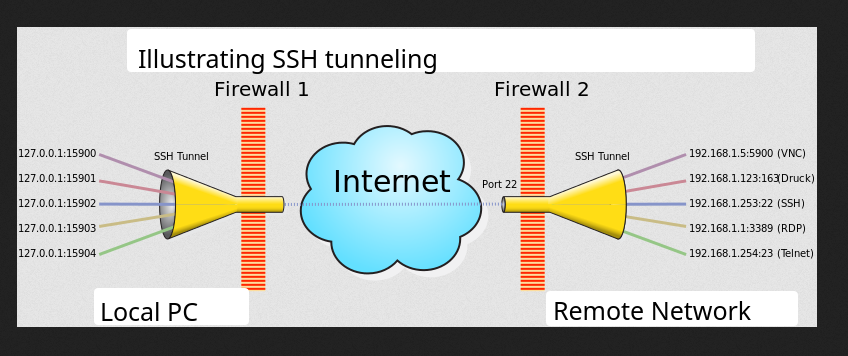
- Port Forwarding and Tunneling: SSH supports port forwarding and tunneling, allowing users to securely access services running on remote servers or bypass network restrictions. This feature is valuable for accessing internal resources or securing connections to services like databases or web servers.
- Key Management: SSH uses public-key cryptography for authentication, requiring users to generate key pairs consisting of a public key and a private key. Proper key management practices are crucial for maintaining the security of SSH connections, including safeguarding private keys and managing access permissions.
How to Install it - Server side
Do NOT forget to open the correct ports to, ssh uses 22 as standard
——————————————————————————————-
Make sure that the packages are the latest version
sudo apt update && apt upgrade -y
and reboot the server
sudo systemctl reboot
Install OpenSSH Server
1 – Install the package
sudo apt install openssh-server
2 a) Verify that ssh is installed
ssh -V
OR
The status of it
sudo systemctl status ssh
3 – Start and Enable the SSH Service
sudo systemctl start ssh
sudo systemctl enable ssh
4 – Configure the SSH Server. The file is usually located at /etc/ssh/sshd_config
open it with nano
sudo nano /etc/ssh/sshd_config
5 – Here is what we want to do: Set port number for ssh(default is 22), disable root login(for security) and specify which user are allow to ssh into. You will need to add/modify.
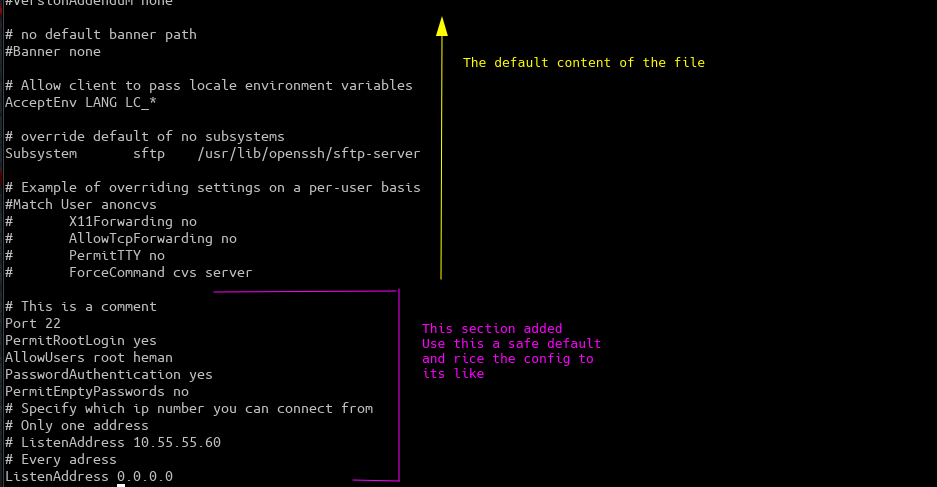
Here’s a basic template for SSH config file(SERVER SIDE). If you comment out the line AllowUsers hero superman when ALL will be able to ssh in if entering the right credentials
# This is a comment. Comments start with '#' and are ignored by SSH.

Port 22
PermitRootLogin no
# Enable ssh login for user hero and superman
AllowUsers hero superman
Advanced. You could play around here with these setting. Like
PermitRootLogin: Ensure that other security settings, like PermitRootLogin, are configured as desired. For instance, if you want to allow or disallow root login, adjust this setting accordingly:
PermitRootLogin no
Ensure PasswordAuthentication is set as per your security policy. To allow password-based logins:
PasswordAuthentication yes
Ensure that password can NOT be empty
PermitEmptyPasswords no
Public Key Authentication: For enhanced security, you might want to enforce public key authentication:
PubkeyAuthentication yes
Add or Modify the AllowGroups Directive:
AllowGroups group1 group2
5 – Restart the SSH Service
sudo systemctl restart ssh
6 – Make sure that the firewall (usually ufw) allow SSH traffic otherwise
sudo ufw allow 22/tcp
sudo ufw disable && sudo ufw enable
Example how the file
/etc/ssh/sshd_config
might look

Some tip to test out that the Server is configured correct
Connect a computer into the same subnet as the server. Try log in with a user. If this is successful you now know that this is a user that you can test out with. This will ensure that some other firewall blocks the traffic, e.i the router is not hindering to ssh into the server. Expand later with with different subnet on the LAN and expand this to the WAN if desired.
Configuration (rules of firewall) of the LAN (subnets) is usually done by internal router.
Configuration (rules of firewall) of the WAN is usually done by cable modem(the device that connect you internet). You will also need so set port forwarding here as NAT plays a crucial role here.
Screen shoots
Encryption methods

SSH communication

Termomonlogy and Concept
SSH tunneling
What do i need to use SSH
Connecting to an SSH server using both username/password authentication and public/private key authentication:
-
ssh username@hostname_or_IP
Replace username with your actual username on the server and hostname_or_IP with the hostname or IP address of the SSH server.
- Enter Password: After executing the
sshcommand, you’ll be prompted to enter your password for the specified username. Type your password (characters won’t be displayed as you type for security reasons) and press Enter. - Authentication: The SSH client sends the entered username and password to the SSH server for authentication. If the credentials are correct and the server allows password-based authentication, you’ll be granted access to the server’s command-line interface.
Public/Private Key Authentication: (assumes that public/private key are present on computer)
- Connect Using SSH Key: Use the
sshcommand as before, but this time, the SSH client automatically presents your private key to the server for authentication:-
ssh username@hostname_or_IP
If you’ve encrypted your private key with a passphrase, you’ll be prompted to enter it.
- Authentication: The SSH client presents your public key to the server. If the server finds a matching public key in the
authorized_keysfile for the specified username, and if key-based authentication is allowed, you’ll be granted access to the server without needing to enter a password.
By following these steps, you can connect to an SSH server using both username/password authentication and public/private key authentication.
-
Managing multiple ssh connections with config file (Client Side) - Recommended
The SSH config file (~/.ssh/config on Unix-like systems) is used to manage and customize SSH connections, especially when dealing with multiple hosts and complex configurations. It allows you to define connection options, authentication details, port forwarding settings, and more for individual hosts or groups of hosts. Here’s an overview of how the SSH config file is used to manage multiple SSH connections:
1. Simplify Connection Process:
By specifying connection details in the config file, you can avoid typing long and complex SSH commands each time you connect to a host. This simplifies the connection process, especially for hosts with non-standard settings or configurations.
2. Centralized Configuration:
The SSH config file acts as a centralized location for storing SSH configuration options. Instead of configuring each SSH connection separately, you can define global settings and apply them to multiple hosts or groups of hosts as needed.
3. Customization and Organization:
You can customize SSH connections by setting options such as usernames, hostnames, port numbers, identity files, and connection options. The config file allows you to organize these settings logically and efficiently, making it easier to manage multiple SSH connections.
4. Port Forwarding and Tunneling:
SSH config supports port forwarding and tunneling configurations, allowing you to set up local and remote port forwards for individual hosts or groups of hosts. This is useful for accessing services running on remote hosts securely or bypassing network restrictions.
Sample SSH Config Template:
Here’s a basic template for an SSH config file(CLIENT SIDE) with comments explaining each section
# This is a comment. Comments start with '#' and are ignored by SSH.

# Host definition
Host example.com
# Hostname or IP address of the remote server
HostName 123.456.789.0

# Port number (optional, default is 22)
Port 22

# User to log in as (optional, uses current user by default)
User your_username

# IdentityFile specifies the private key to use for authentication
IdentityFile ~/.ssh/your_private_key

# Specify other SSH options if needed (optional)
# For example, to enable compression:
# Compression yes

# Define aliases for the host (optional)
# HostAlias alias1 alias2

# Define SSH protocol version (optional, default is 2)
# Protocol 2

# Define custom SSH options specific to this host (optional)
# This can be used to override global options for this host.
# For example:
# RemoteCommand ls -l

# Keep SSH connections alive by sending a packet every 60 seconds
# ServerAliveInterval 60
# Local port forwarding configuration
# LocalForward 8080 localhost:80

# Host definition
Host example.com
HostName 123.456.789.0
Port 22
User your_username
IdentityFile ~/.ssh/your_private_key
Setting Correct Permissions and ownership
Typically you want the permissions to be(chmod):
.sshdirectory:700 (drwx------)chmod 700 ~/.ssh
- public key (
.pubfile):644 (-rw-r--r--)chmod 644 ~/.ssh/nameofpublicfile
- private key (
id_rsa):600 (-rw-------)chmod 600 ~/.ssh/nameofprivatefile
- lastly your home directory should not be writeable by the group or others (at most
700 (drwx------)).chmod 755 ~/
- ssh config file (
config):600 (-rw-------)chmod 600 ~/.ssh/config
- authorized_key needs 644 permissions
chmod 644 ~/.ssh/authorized_keys
Check up this
Make sure that user owns the files/folders and not root: chown user:user authorized_keys and chown user:user /home/$USER/.ssh
Also worth mentioning is that when using tools like ssh-key-gen and ssh-id-copy this permission gets set automatically by the tool
Folder structure (mainly Server Side)
/etc/ssh/: This directory contains configuration files and keys related to the SSH server (sshd) and client (ssh).sshd_config: Server side. The main configuration file for the SSH daemon (sshd). This file controls the behavior of the SSH server, including settings like authentication methods, allowed users, and port number.ssh_config: Client side. The configuration file for the SSH client (ssh). This file contains client-side configuration options, such as default settings for connecting to SSH servers.ssh_host_*_key: Server side. These files contain the host keys used by the SSH server for authentication. The*_keyfiles represent different types of keys, such as RSA, DSA, or ECDSA.ssh_host_*_key.pub: Server side. These files contain the public counterparts of the host keys. They are used by SSH clients to verify the authenticity of the SSH server during the connection process.
/etc/ssh/sshd_config.d/(optional): Server side. Some distributions organize SSH server configuration using additional configuration files in this directory. These files are typically included from the mainsshd_configfile and can help organize complex configurations./etc/ssh/ssh_known_hosts:This file contains a list of known host keys for various SSH servers. This mean that the server can connect to others ssh servers(and that is the hosts)- /etc/ssh/sshrc (optional): This file is a script that is executed by the SSH daemon (
sshd) when a user logs in. It can be used to perform custom actions or settings for SSH sessions. - /var/log/auth.log (or similar): This is the system log file where SSH-related authentication and authorization messages are typically logged. It can be useful for troubleshooting SSH connection issues or security incidents.
The most important file is the configuration file, sshd_config file, this is the server config file
Some of the key settings you might find in the sshd_config file include:
Port: Specifies the port on which the SSH server listens for incoming connections. By default, SSH uses port 22, but you can change it for security reasons.PermitRootLogin: Determines whether root is allowed to log in directly via SSH. It’s generally recommended to set this tonoand use a regular user account to log in, then switch to the root user if necessary.PubkeyAuthentication: Controls whether public key authentication is allowed. This is often preferred over password authentication for increased security.PasswordAuthentication: Specifies whether password authentication is allowed. It’s recommended to disable password authentication if you’re using public key authentication.AllowUsersorAllowGroups: Limits SSH access to specific users or groups. This can be useful for restricting access to certain users or groups of users.UsePAM: Determines whether the SSH server should use PAM (Pluggable Authentication Modules) for authentication. PAM provides a flexible framework for authentication, which can be integrated with various authentication methods.HostKey: Specifies the location of the host keys used for SSH server authentication. These keys are used to verify the authenticity of the SSH server to clients.
These are just a few examples of configuration options you might find in
FAQ
Difference between ssh and sshd
- SSH (Secure Shell): SSH is a cryptographic network protocol used for secure communication between two computers, typically a client and a server. It provides a secure way to access and manage remote systems over an unsecured network. SSH encrypts data transmitted over the network and provides authentication mechanisms to ensure the integrity and confidentiality of communications.
- sshd (SSH daemon):
sshdis the SSH server daemon, which runs on the server side and listens for incoming SSH connections from clients. It is responsible for handling authentication requests, establishing encrypted communication channels, and managing SSH sessions. The SSH daemon (sshd) runs continuously in the background, waiting for incoming SSH connections on the server’s designated SSH port (usually port 22 by default).
Commands - Client Side
| DESCRIPTION | COMMAND |
|---|---|
| Connect to an SSH server using user and password | ssh username@hostname_or_IP |
| Connect to an SSH server using user and password and PORT number | ssh -p port_number username@hostname_or_IP |
| Connect to an SSH server using keys (public/private) | ssh username@hostname_or_IP |
| Connect to an SSH server using keys (public/private) and PORT number | ssh -p port_number username@hostname_or_IP |
|
Connect to an SSH server using a source ip and target ip with a portnumber |
ssh -b "source_ip" -p "portnumber" user@"target_ip" |
| Connect to an SSH server using a specific key and port number | ssh -i /path/to/private_key -p port_number username@hostname_or_IP |
|
Connect to an SSH server using a specific ip specific key specific port number |
ssh -b "local_ip_address" -i "path_to_private_key" -p "port_number" user@remote_host |
Commands - Server Side
| DESCRIPTION | COMMAND |
|---|---|
| Restart the ssh daemon | sudo service sshd restart |

